


Word expert and indie author Ian Andrew is based in Australia
For the many indie authors who still favor Microsoft ® Word for formatting their books, here's a companion piece to Ian Andrew's recent post about using Word to create ebook interiors. Yes, you've guessed it – this time, he's explaining how to use Word to format print books. As a former Microsoft trainer turned self-published author, he is able to speak from considerable relevant experience. Over to Ian…
As I said in my previous post about using Word to format ebooks, I get that some of you are keyboard wizards and witches, warriors all, scurrying away with ‘fantastical' word processing programs, like Scrivener, but, there are quite a lot of us, mere two-finger mortals, still ploughing our lonely furrows with that bastion of word processing software, the mighty Microsoft® Word.
Now, in a former life, I was an accredited trainer of all things Microsoft®,and the biggest revelation to me was how poorly prepared people were when given a PC and expected to “get on with it”.
 We wouldn’t let a welder just weld, but we let an administrator just wield their way through Word. Normally woefully. Thankfully, it needn’t be that way.
To format a document for print is a simple matter of using things that expert programmers have built into Word for us. Sadly, so few even know these things exist, let alone how to use them.
So, if you want to format a Word document such that it sails through the approval process for both Amazon's Createspace and Ingram Spark's system, then read on…
1) Size Matters
![]() First things first, decide upon the size you want your book to be.
First things first, decide upon the size you want your book to be.
You'd think this would be quite easy. Find a book on your bookshelf that you want your book to be like. Measure it and set your page size in Word to be just that.
Sadly, it's not quite that easy. Ingram and Createspace both support a wide, wide range of sizes, but some, to badly paraphrase, ‘are more supported than others'.
First off, not all formats that are industry standards (like Format A) are supported for Indie Authors. Then, the ones that are can be limited in the type of paper colour and cover format that they can take.
So, if you want your book to be black and white type with no internal illustrations, printed on creme paper with a Matt cover, then go to CreateSpace and Ingram and check that they support those options in the size you want.
For me, I had it easy. My crime novels are B&W text on creme paper with a matt cover in an overall book size of 8.00 inches by 5.25 inches. The resultant line within Ingram looks like this: B&W 5.25 x 8 in or 203 x 133mm Perfect Bound on Creme w/Matte Lam.
So, I went on to Createspace and downloaded one of their Word templates for a book that was 8×5.25 and this document became my starting point. Downloading a template is by far the preferred way to set your page size up as it will also set up your margins for you. But in case you don't have that, you need to know about margins too.
2) Mastering Margins
Set up your margins.
A paperback is a strange beast when it comes to margins. Depending on the size and critically, the number of pages and therefore the ‘thickness' of the book, your margins will vary.
Also, they need to be offset and mirrored – as in, imagine having a book open in front of you. The inner margin on the left-hand page and the inner margin on the right-hand page need to be the same, but the inner on the left is the right-hand margin and the inner on the right is the left-hand margin – get it? The ‘outer' margins are different to the inner, but have to be the same throughout.
Luckily, Word does all of this for you in one simple dialogue box. Phew!
Just go to Page layout on the Ribbon, select Margins and then, at the bottom of the options select Custom Margins.

3) Take a (Section) Break
Learn how to Section Break your document.
You will need to break your document into sections. Reason being, in some of your document you will want to have page numbers in the footer (or header if you want to be trendy), but in other parts of the book, like the title and copyright pages, you won't want numbers.
You will / may also want to add the author's name in to the header on top of the even (or odd) pages and the chapter title on the opposing page header.
To do all of these ‘fiddly' things, you need to have section breaks in your document.
Again, the good news is, Word makes it easy. Simply put your cursor at the foot of a page, select Page Layout and on the drop down next to the word Breaks, you get options for ‘Section Break – Next Page'. Choose it and Word will not only put in a section break, but it will add a new page as well. Voila!

4) Harnessing Headers and Footers
Master your Headers and Footers.
You need page numbers in a paperback. DO NOT add them manually. Double click into your footer and position your cursor where you want your page number to appear. You'll see that the Design Tab has appeared on the Ribbon. Select Page Number from the Header & Footer group. Choose Current Position and then put in the page number format you want. Oh and tick Different Odd & Even Pages in the Options group on the design tab as you'll need that too.
5) Topping and Tailing Chapters
 Use consistent formats for Chapter Headings and ‘Scene Breaks'.
Your chapter headings in a paperback do not have to be tedious and boring. You can be creative and artistic and, as long as you save the document out properly, what you see is what you will get from CreateSpace and Ingram.
So, use drop caps and fiddly, twirly lines and whatever else you want, but… be consistent. Ensure each and every Chapter begins by looking the same. Make especially sure that the device you use for a scene break, be it three *** or a complex line with diamonds and geometrics or a fleur-de-lys has consistent spacing around it.
There is nothing more jarring to the reader's eye than inconsistent layout features.
6) Perfecting PDF Export
Save your document out as a PDF-A. Createspace will take your interior files as a Word document. It will then process and convert it for you into their required format, however, the bottom page margin can be a bit hit and miss and occasionally, if you have a page that is ‘full' of text to the bottom line, CreateSpace can occasionally ‘throw' the last line onto the next page and you end up with what is often called an orphan line. You don't want orphan lines, not least because it is an extra page in your book for no good reason and every page ups the printing costs. Ingram Spark won't accept a raw Word file.
Both CreateSpace and Ingram Spark will accept PDF-A formats, and these will result in you having a document that you can rely on for layout and page breaks, as what you have put in will be locked in.
So, save yourself the time and upload the same PDF-A format to both Ingram Spark and CreateSpace.
But, I hear you cry, (well, muffled whimpers probably,) ‘How do I make a PDF-A?'
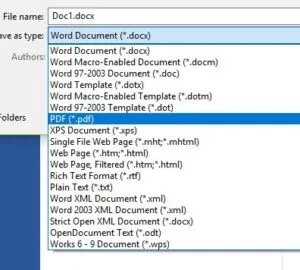
Simple. Go to the File menu in Word, choose Save As, navigate to where you want your document to be saved and save it first as a standard Word .doc document. This is and always will be your master file. Then, go back to Save As, navigate to the same folder and this time, select the drop-down under the filename and select PDF. Once you have done that you will see a small button called options has appeared. Click on it and you will get an Options dialogue box.
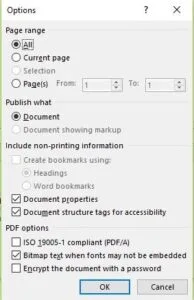 Now, check the option that says ISO 19005-1 compliant (PDF/A). Once checked, leave the rest of the default options as they are, click OK, check you have the filename you want and then click save. That's it. Upload that PDF file into Createspace and Ingram Spark and you are done.
Obviously, there are a few other things you have to do before you upload to either Ingram Spark or Createspace… Like finish your book, get it professionally edited, get a professional cover designed (including a great spine), sort out your front and end matter and add your ISBN, but other than those minor issues, if you do the tips above, you will be well on your way.
For more detailed tuition, Ian's company Book Reality Experience offers online training via its academy at www.bookrealityacademy.com and through its consultancy services at www.bookreality.com.
OVER TO YOU Do you have any further Word formatting tips to add to Ian's list? Feel free to leave a comment!
#Selfpub #authors - here are 6 top tips to help you format your print books in Word, from @IanAndrewAuthor Share on XOTHER POSTS TO HELP YOU FORMAT YOUR BOOKS – FROM THE ALLi ARCHIVE


Oh my God, I just couldn’t thank you enough for saying that we should always monito the measurement of margin in our Word document before printing it. As someone who’s in the process of completing a novel manuscript, this is such a useful tip for me as I want to improve my work quality. I’ll remember this information so the end result can be better.
I have created a. 200 page biography in MSWord and have many color images in the document. Will that work with CreateSpace or Instagram? Also, I have used Styles for Chapter Headings and TOC, will that transfer?
What might be best choice for only 20 copies. Mainly for family and friends. Will be paperback.
Absolutely the MOST helpful aid for formatting. I have been struggling with videos, and worst of all phone calls to techs who couldn’t do it. Thank you so much. Happy dance here at the ranch.
Why do you have Bitmap ticked in your graphic, when your text says to tick ISO 19005-1 compliant (PDF/A)? Otherwise, thanks for the info.