


Non-fiction author Denise Gaskins
Many experienced book designers prefer Adobe InDesign for indexing, but Microsoft Word's system suits plenty of authors just as well. The tips below apply broadly, but the technical details here are Word-specific.
Save a New File and Insert Manual Page Breaks
Don't start indexing until every other part of your book is finished and final, since changes made afterward can throw the whole index off. Save your finished layout as your master file. Then save it again under a new name as your indexing file; indexing adds a lot of invisible markup, and you don't want to risk your master.
Go through your indexing file and insert a manual page break (Ctrl+Enter, or Cmd+Enter on a Mac) at every point where a page ends in your master file. This lets you adjust the indexing document's layout without shifting page numbers. If a page in your book is illustration-only, leave a placeholder page, or describe the image if you want to reference it in your index.
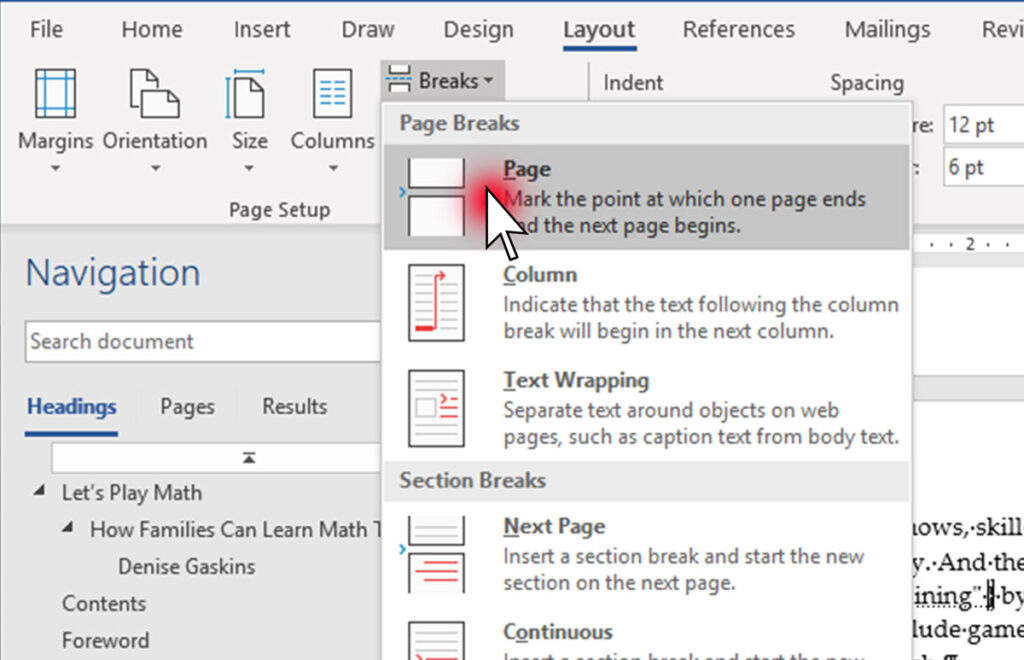
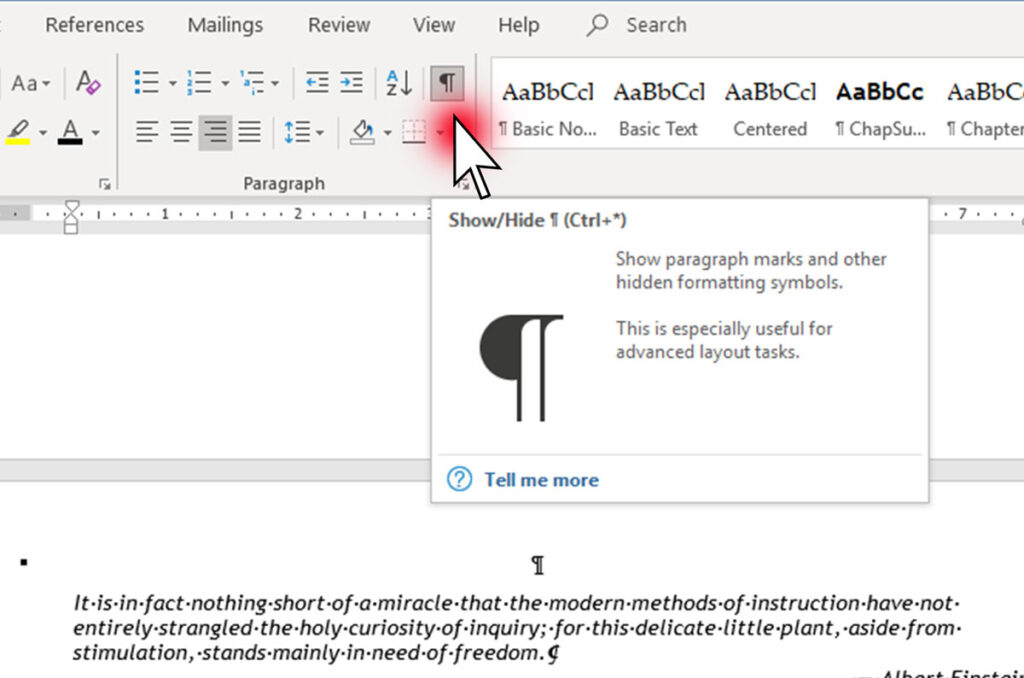
Double-check that your indexing file's page numbers echo your master layout exactly. The look doesn't need to match, but the words and paragraphs on each page must, with the manual break in the right place. Once it lines up, turn on Word's hidden characters (the backward-P symbol on the Home tab) so you can see exactly what Word is doing.
Publish Your Non-Fiction Book Successfully
You've created an index, now it's time to publish your book the right way.
Mark Your Index Topics
Open the page of your indexing file that matches your paper brainstorming notes. On Word's References tab, click “Mark Entry” to open the indexing dialog.
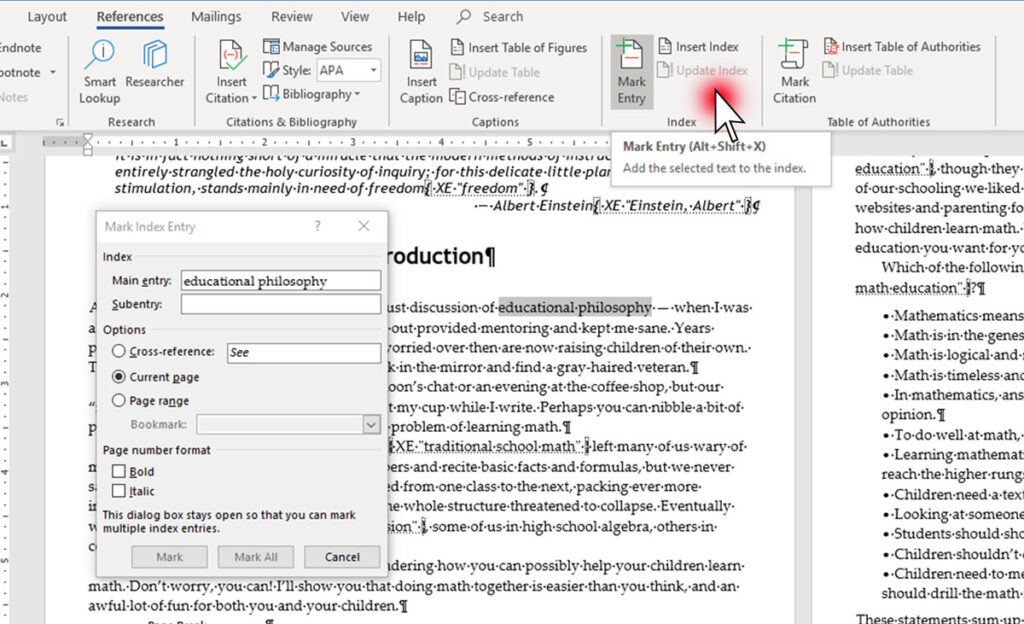
If your text contains the exact words you want in your index, highlight them and click into the “Main entry” box, and Word fills them in automatically. Otherwise, place your cursor in the relevant paragraph and type your topic directly.
Choose “Current page” for the reference option, not cross-references, since readers shouldn't have to work harder to find what they came for. Click “Mark,” and Word adds your entry in hidden-character brackets: { XE "educational philosophy" }, or with a subentry separated by a colon: { XE "teaching:math facts" }. The text inside the quotation marks is what appears in your index, and you can edit it freely. Copy and paste the whole bracketed chunk to reuse an entry on later pages.
Use “Mark All” with caution. The software can't distinguish between a paragraph that meaningfully discusses a topic and one that merely mentions it in passing.
Tips for Index Entries
- Don't capitalise entries, except for proper nouns.
- Enter names as “Last name, First name.”
- Skip quotation marks or other symbols in entries.
- Be concise, avoiding articles (a, an, the) where possible.
- Adjectives follow the noun, separated by a comma: “noun, adjective.”
- For gerund phrases, consider entering both the plain and inverted form on the same paragraph, e.g.
{ XE "counting on fingers" }and{ XE "fingers, counting on" }, so readers can find it either way. - To reference a range of pages rather than just the start, you'll need bookmarks first: see Microsoft's guide to page-range entries.
For detailed formatting conventions, the Chicago Manual of Style's indexing chapter is the standard reference.
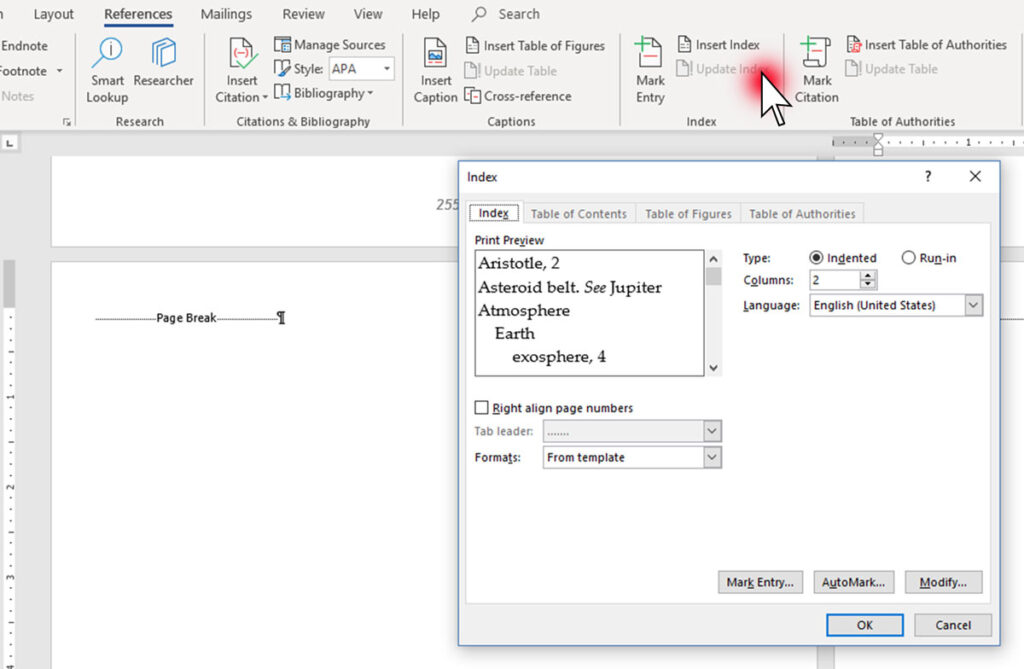
Once you've marked everything from your brainstorm, plus anything new that occurred to you along the way, insert a page break at the end of your file, then use the References tab's “Insert Index” button to generate your first draft.
Refine Your Index
Print your draft index and compare it against your master document, thinking like a reader throughout:
- Check every page number against your master file.
- Double-check spelling, especially names.
- Cut repetitive entries, keeping only the first page of a run, since readers can continue reading from there.
- Merge near-duplicate entries (singular vs. plural of the same term) unless they're different enough to warrant separate listings.
- Add subtopics to any entry with more than five page numbers.
- Combine single-reference entries into a broader topic as a subentry, or find more pages to support them.
Edit the markup, not the generated text. Changes to the output text vanish the next time you regenerate. To edit an entry, change the text inside the quotation marks in the original { XE } field, for example splitting { XE "teaching math" } into { XE "teaching:hands-on" } and { XE "teaching:Socratic questions" }. To remove a topic, delete the entire field including the brackets. Regenerate, and repeat the cycle until you're satisfied.
Publish Your Non-Fiction Book Successfully
You've created an index, now it's time to publish your book the right way.
Transfer to Your Master File
Copy your finished index and paste it as plain text at the end of your master book file. Use hanging indents, where the first line of each entry sits farthest left (the opposite of a normal paragraph), with subentries indented under their main entry, and any wrapped page numbers indented further still. Format in narrow columns at a slightly smaller font size than your body text, with a “continued” line at the top whenever an entry spans two columns. Joel Friedlander's article on index formatting covers this in detail for InDesign, but the same principles apply to Word styles.
Converting Your Index for Large Print or Hardback Editions
If you're producing more than one format, here's what carries over and what doesn't:
- Hardback vs. standard paperback: usually no problem. If the interior layout and trim size are identical, your pagination is identical, so the same index works for both without changes.
- Large print: genuinely different. A bigger point size (often with a different trim size too) means the whole book reflows, so a topic on page 47 in your paperback might land on page 61 in large print.
This is exactly where the method above pays off. Because you built your index using Word's embedded XE field codes rather than typing page numbers by hand, converting for large print is largely automatic: reflow your large-print layout, then regenerate the index, and Word recalculates every locator against the new pagination for you.
If an earlier version of this book was indexed as a flat typed list instead, AI can genuinely help here: given the manuscript, the old index, and the new large-print file, it can help remap entries to their approximate new locations, saving you page-by-page manual work. AI is also useful afterward as a sense-check: flag any entry whose page range changed unusually (a topic that spanned two pages now spanning five) as a sign something shifted more than expected during reflow.
Building an Ebook Index
Since ebooks can't show true page numbers, the index needs a different approach:
- At the end of your manuscript, add a page titled “Index” formatted as Heading 2, so it appears in your table of contents.
- Find each occurrence of a term you want indexed in your book's text. Highlight it, then bookmark it (Insert > Bookmark). Since ebooks can't list multiple page numbers per entry, number repeated bookmarks sequentially, e.g.
imagination1,imagination2,imagination3. - Back on your index page, select each entry and hyperlink it to the matching bookmark.
- Check your work: upload the file to Kindle Create and click through each index link to confirm it jumps to the right spot.
It's more time-consuming than a print index, but far more achievable than it looked a few years ago, and it gives ebook readers the same navigable experience print readers get.
What this means for you:
- Only publishing an ebook? Use the bookmark/hyperlink method above; skip Word's XE markup entirely.
- Planning a large print edition? Build your original index with embedded XE fields so the large-print version regenerates automatically.
- Using AI to help? Treat it as a brainstorming and QA tool, not a finished product, and review every entry it suggests.
- Not confident doing this yourself? A professional indexer (see Part One) may be the better investment for a long or technical book.
Update Your Index as Needed
Revisions happen. When they do, work through your master file and indexing file side by side, replacing any changed text and marking new topics as you go. Redo the manual page breaks from that point in the book onward; markup on unchanged pages stays intact. Generate a new index and copy it back into your revised master file.
Creating a DIY nonfiction index is real work, but it's an investment in your book's future. Well-indexed nonfiction makes for happy readers, and happy readers are your best marketing.
Publish Your Non-Fiction Book Successfully
You've created an index, now it's time to publish your book the right way.
Missed Part One?
Go back to Part One for how to plan your index: brainstorming topics, deciding whether to index your ebook, and choosing the right tools.
Alliance of Independent Authors
The global non-profit association for indie authors
ALLi members get all guidebooks free, personalised advice, a range of benefits, discounts and deals–and access to a community of thousands of working indie authors.
If you're serious about publishing well, membership is your next step.