


Your book's cover is one of the most powerful marketing assets at your disposal. Combine that with Facebook's new 3D Photos feature, and you've got a marketing gimmick that's sure to turn heads. I'm going to show you how to create a 3D depth map for book covers.
For more information on how to get the perfect book cover, see ALLi's Ultimate Guide to Getting The Perfect Book Cover.
Read on to learn how you can convert your own book cover into an eye-catching 3D image on Facebook.
How does it work?
Until recently, Facebook's 3D photos were only available to iPhone users. Now, however, Facebook allows you to upload a separate depth map with almost any photo. This depth map is a greyscale image that tells Facebook to display parts of the image closer or further to the viewer, creating the 3D effect.
Darker areas on the depth map are further away from the viewer, and lighter areas are closer.
To create your own 3D cover image, all you need to do is create a depth map that matches the “layers” of your cover art. You'll upload the depth map with your original art, and Facebook will automatically convert it to a 3D image. It's important to note that this only works on Facebook; if you wish to display the 3D art on your blog or elsewhere, you'll have to embed a Facebook post into the page.
Which photos are a good candidate for 3D?
The 3D effect works best on images that can be divided into layers clean, sharp edges. Glows, fog, blurry edges, and gradients may make an image unsuitable.
Thin lines are poorly suited to 3D, so trying to isolate text onto its own layer may cause unpleasant smearing or jagged artifacts that ruin the effect. For this reason, I prefer to use the artwork without a title or author, and provide the book details in the text of the post. But if you can keep the text together with the background or a larger layer, you may be able to make it work.
Use a high resolution, at least 1200 x 1600 pixels.
Facebook won't accept photos over a certain aspect ratio, roughly 3:4 (6″x8″, for example). A 6″x9″ book cover won't work without cropping or pillarboxing, which we'll get to a little later in this tutorial.
But first: the depth map.
How to create a 3D photo depth map
Start by firing up your favorite image editor. I'm a Photoshop guy, but you can use GIMP, Illustrator, CorelDraw, or any software that lets you draw or paint in separate layers.
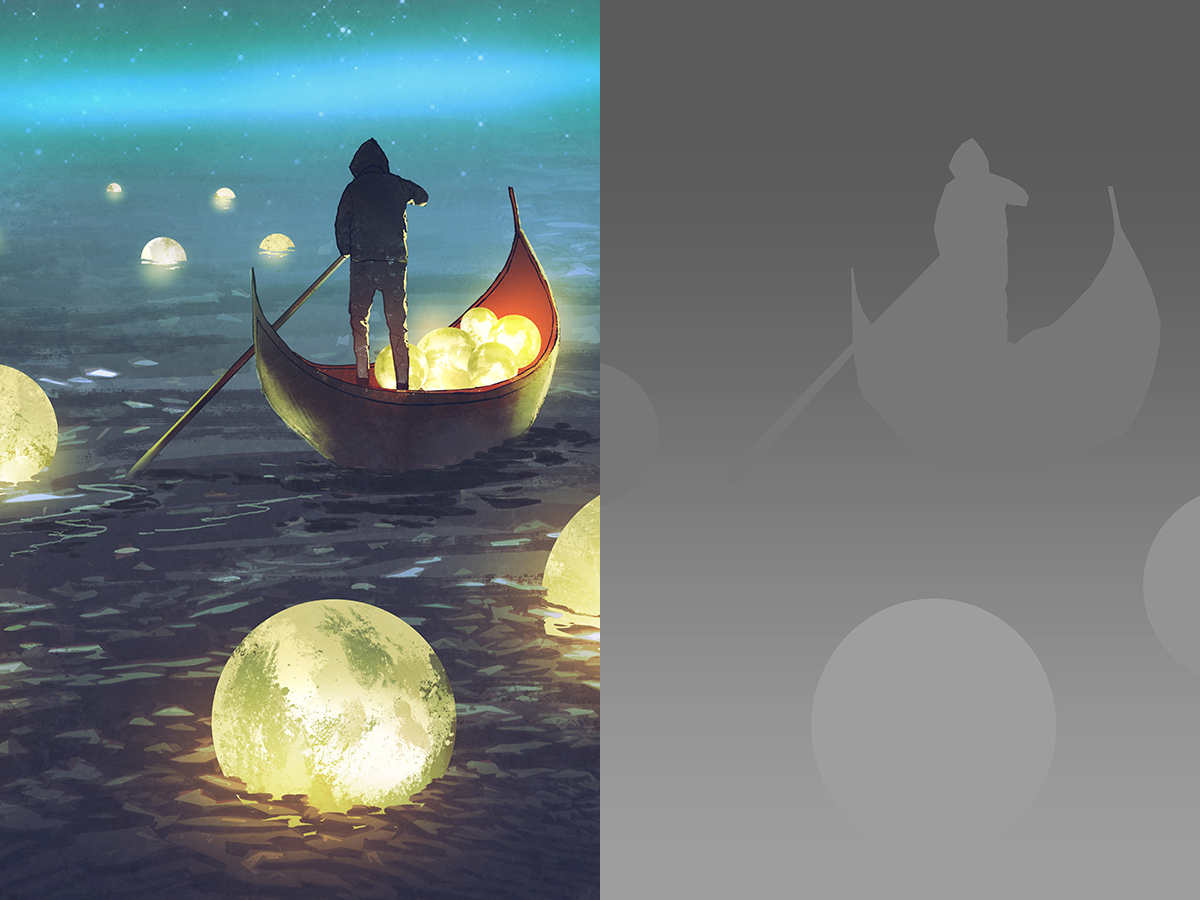
What we're going to create is essentially a paint-by-numbers map, with progressively darker shades of grey. For this tutorial, I'm using a Shutterstock artwork by Tithi Luadthong, which I've cropped to 6×8 (1200×1800 pixels).
Start by placing a copy of your artwork on the bottom layer.
Next, create a new layer for your depth map. I like to place this in a folder so I can hide or show the entire depth map easily.

Decide which parts of your image are going to be closest to the viewer, and which will be furthest. You should strive for at least three levels: foreground, midground, and background.
Using the lasso tool or a freehand brush, carefully trace the closest parts of the image and fill them with a light grey. I'm selecting the closest moon in the artwork.
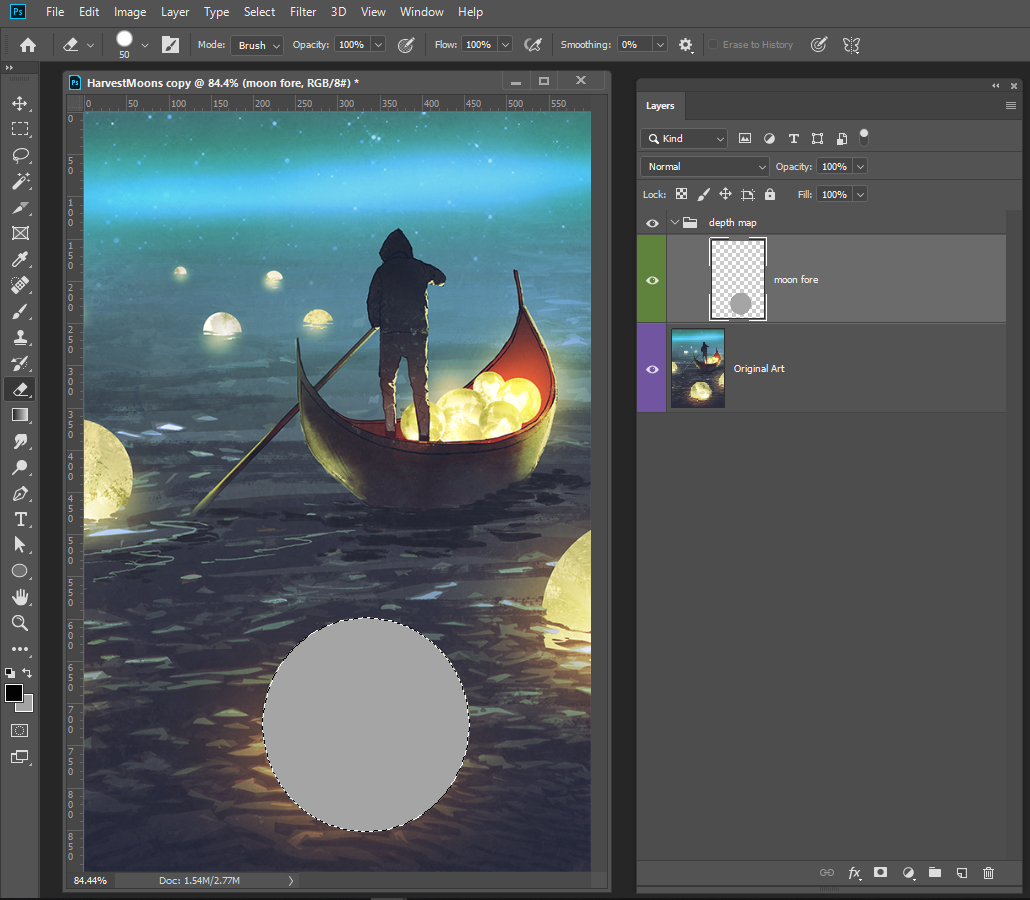
When you're done, hide this layer so you can see the original artwork.
Create a new layer below your foreground layer, and decide which part of the image is further back. Trace and fill it with a slightly darker grey, perhaps 2%-4% darker than the layer above it. It doesn't matter if this overlaps with the previous layer, as the higher/closer layer will cover any overlap.
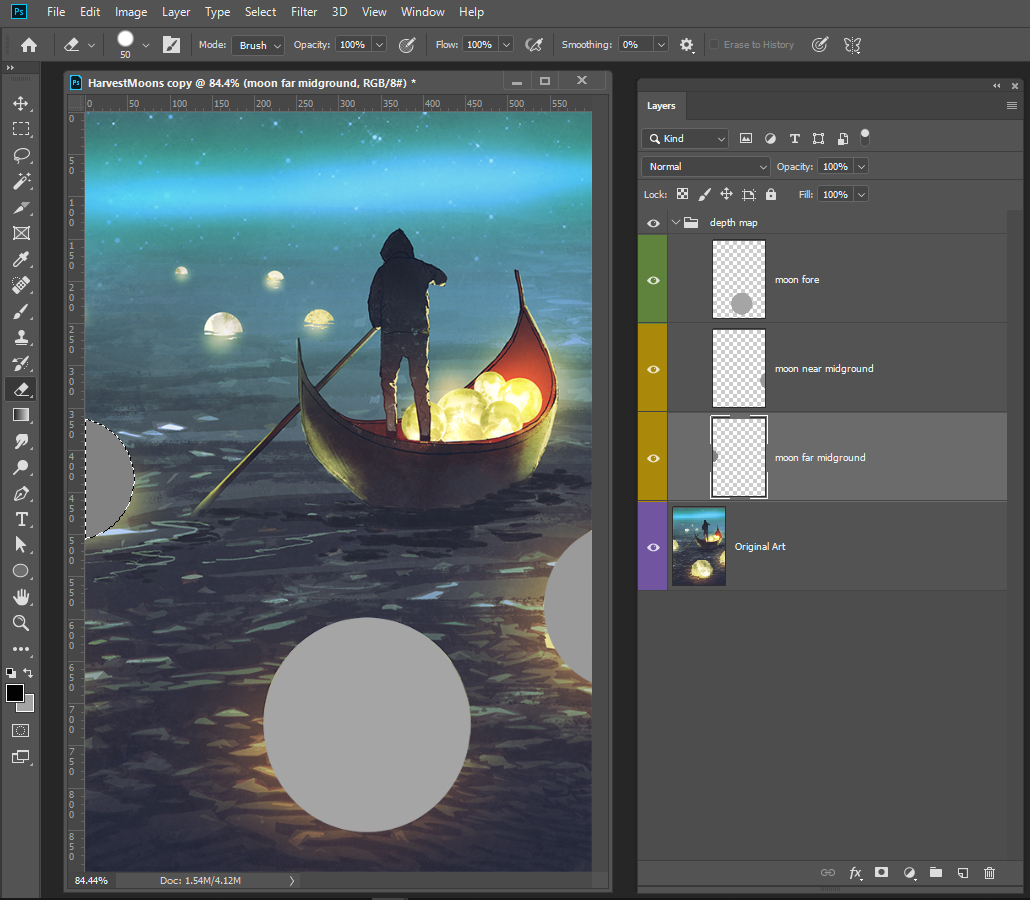
Repeat the process, creating layers and filling the appropriate areas with progressively darker shades of grey. Note that my outline for the boat isn't all that precise; I've used the polygonal lasso tool to create a quick, angular selection around it. Precision offers diminishing returns here, so don't spend too much time refining your outline. The 3D effect is fairly forgiving, and minor imperfections will usually be unnoticeable. And you can always go back and refine the image as needed.
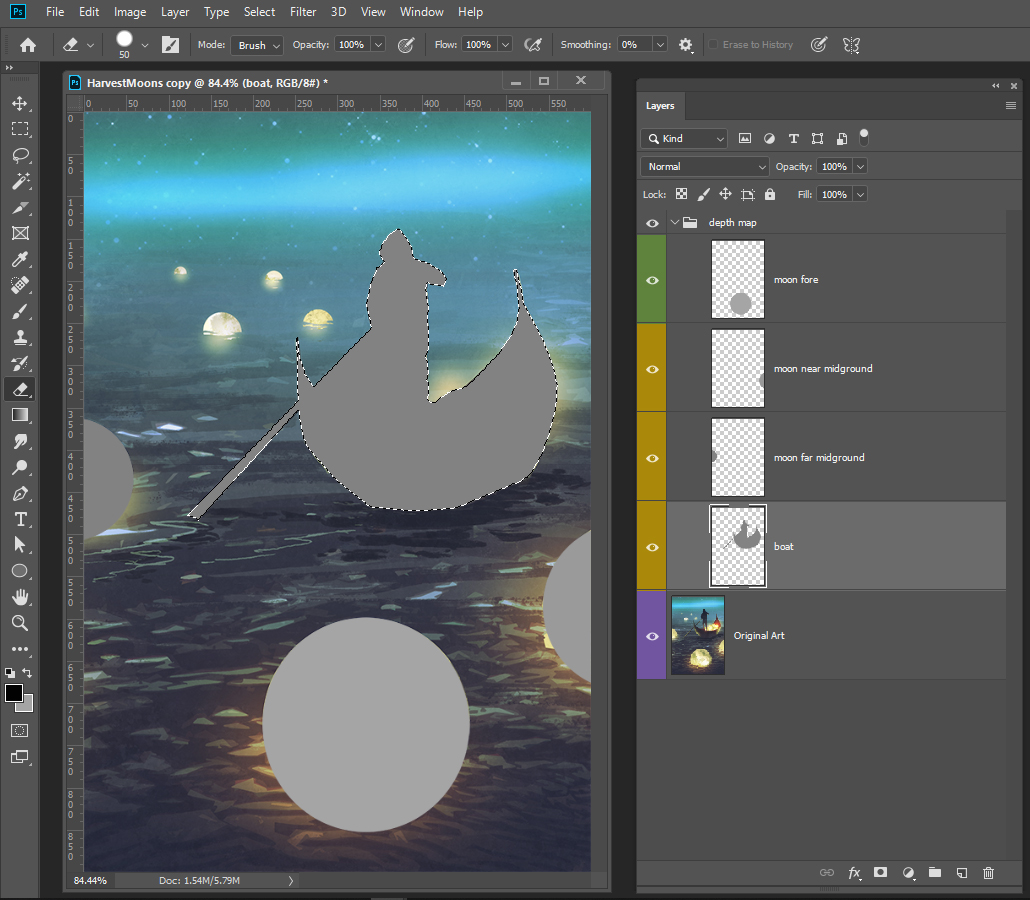
When the major elements of your composition have been placed, create a background layer at the bottom of the stack, and fill it with a dark grey to complete the depth map.
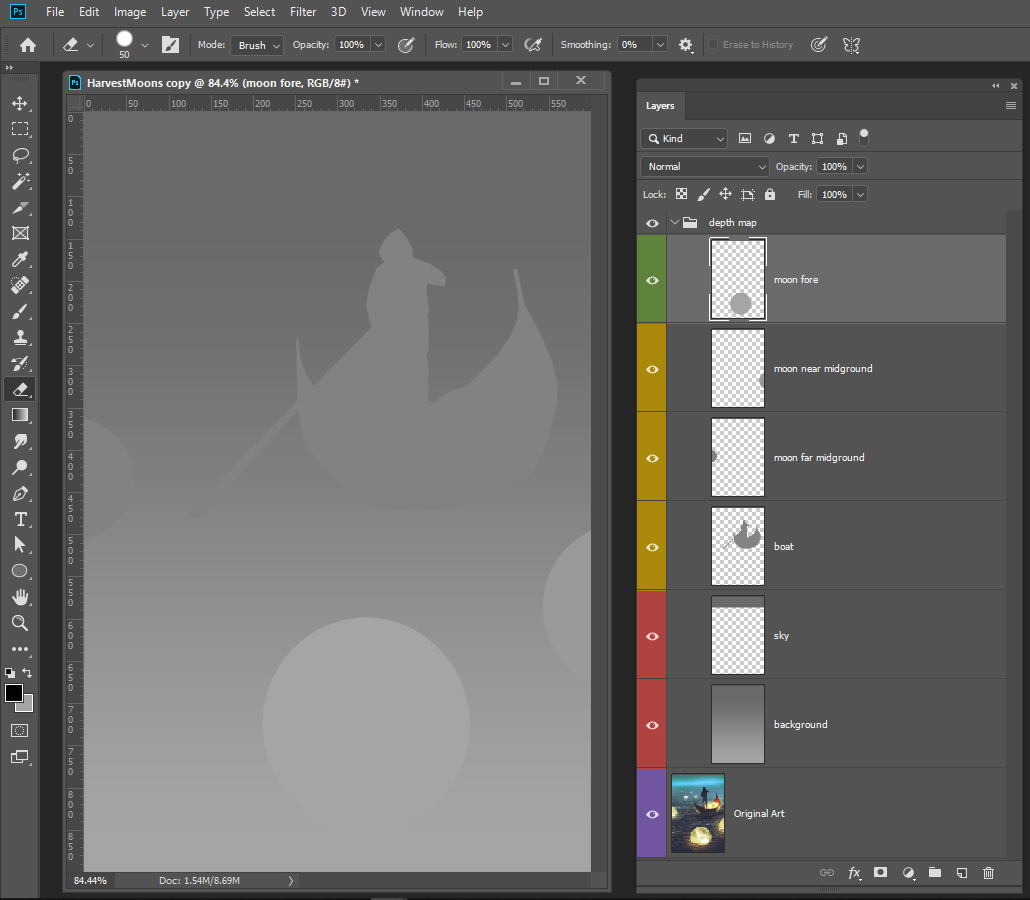
Turn on all the layers you have created, and you should have a greyscale image that covers the entire canvas. If you've missed any areas and can see some of the original artwork, or if your background layer shows through in an area that should be closer to the viewer, go back to the appropriate layer and touch up those holes.
Save your greyscale depth map as a JPEG file with the same filename as your artwork, but with “_depth” added. So, if your artwork is named artwork.jpg, you'll save the depth map as artwork_depth.jpg.
Create a new post on Facebook, and click the Photo/Video button. Select both of the files (artwork and depth map) and upload them. After a brief pause, Facebook will automatically create a 3D preview.
Converting a 6″x9″ cover to 3D
Facebook can't handle a 6:9 aspect ratio, but there are two ways of getting around this.
The simplest solution is simply to crop the image to 6:8 (for example, 1200 x 1600 or 2400 x 3200 pixels).
If your cover contains important elements that can't be cropped in this way, you'll need to find another workaround. One option is pillarboxing. It's like letterboxing, but vertical: bars are added to the left and right of the image to fit the 6:8 aspect ratio. This empty space can be filed with a solid color; a heavily blurred, enlarged version of the artwork; or a decorative frame. With the right shade on the depth map, the edges are almost invisible, but placing it in the extreme foreground or background of the image can create interesting effects, as if looking through a window or at an embossed plaque.
The Treasure of Capric and Smash All the Windows above use pillarboxing to include as much of the image as possible.
If you have a mockup or photo of the physical book, this can be rendered as a 3D photo overlaid on the background of your choice. This technique can be used with any cover, regardless of size or content.
Tips and tricks
Although you can create as many layers as you like, most images look great with only a few layers. Start simple, and refine as needed.
Keep your depth map shades close to 50 percent, and vary them in small increments from one layer to the next. If you find that the 3D effect has shearing or artifacts, adjust the brightness and contrast of the layers to bring them closer to the same tone. Conversely, if the 3D effect is too subtle, increase the contrast between layers to make them project off the page more.
Creating slight changes of depth on foreground elements really makes the image pop. In the 3D adaptation of Crown of Fire, below, note how the plant and hands are at a slightly different depth then the sleeves; the forearms are slightly in front of the upper arms; the hood is slightly in front of the face. A little work on these key elements can make huge contributions to the overall effect.
If your art features open landscape stretching off into this distance, a gradient from dark (far) to light (near) can create a beautiful, smooth transition. You can see this effect at work in the ocean background of the Moon Harvest art. It's a bit trickier to pull off due to the need to match the shades of other layers at specific depths, so beginners are encouraged to try a solid background first.
Troubleshooting
3D effect shows white areas or smears of solid color
The further apart the shades of grey in your depth map are, the greater the simulated 3D effect. The system is just simulating what's “behind” the closest parts of the image, and if those extend too far towards the viewer, there's nothing to display. This results in large white areas or ugly smearing. To avoid this, keep the changes in grey as small as possible, and avoid pure black or pure white.
White or black lines appear at the edges of layers
Thin lines may create artifacts when viewed in 3D. To eliminate this defect, try expanding the text by a few pixels on the depth map (but not the artwork). You can also try a gentle Gaussian blur effect to eliminate jagged lines.
3D image looks “weird”
Be sure your foreground elements are lighter than your background elements. You may have inadvertently flipped light and dark, which creates a surreal cut-out effect.
“Failed to create 3D Photo” error
Your image may be too tall or too wide, or you may have saved the files in a format other than JPEG.
Facebook posts two separate photos instead of a 3D image
Ensure that the artwork and depth map are correctly named as artwork.jpg and artwork_depth.jpg.
Over to You
3D photos are undeniably a gimmick, and one that may quickly become cliche. In the short term, however, they're a fun way to draw attention to your book and revitalize your Facebook marketing.
Now that you know how to create a 3D Photo, give it a try! Practice on a photo of your cat, your spouse, or that awesome selfie you took last week. And when you've created your magnificent 3D adaptation of your book cover, please share it with us in the comments below.
Bring your #bookcover to life with Facebook's 3D Photos! — by @johndoppler Share on X


Excellent 🙂 loved it. Photoshop is a great tool which iam learning daily.
akashwebdesigns
Hiya.
I’m excited about this, thank you. On my first attempt, however, when I upload the original and the GIMP created depth map, Facebook simply displays them both. I’m trying this on Windows PC.
Any further advice, please?
Cheers.
Ian.
Ah, never mind, I just had to simplify the file name. I had it as a date. I changed it to just Bailey and Bailey_depth and that worked.
Now to do a better job, though as that one didn’t work very well. I had leaves breaking in two. Heh.
Cheers.
Ian.
What a fantastic find! I can’t wait to give it a try. What’s the best way of retrieving the photo to transfer to bookcover, screenprint? Or direct save? And to make 6×9, does it work to place the 6×8 over the original, perhaps with a bit of sky on the top inch? Or maybe do it in two parts? I’m a Photoshop addict too and this looks fun to play with.
Cool! I can’t wait to try this. I love GIMP and am looking forward to experimenting with this technique. Thanks for the instructions!