


When you open your completed manuscript to start editing, it seems like a monumental task. But like any project, if you break it down into stages, the baby steps are much more manageable. Which is why today's ultimate guide is all about self-editing your manuscript. The Alliance of Independent Authors’ AskALLi team thanks all ALLi members and partners who shared their experiences, in particular Richard Bradburn of Editorial.ie, Lisa Lepki of ProWritingAid, Alison Shakspeare of Shakspeare Editorial, and Kristina Stanley of Fictionary.co for their in-depth contributions and advice.
After the introduction by ALLi member and editor Richard Bradburn of Editorial.ie, the post is structured in three stages:
- getting your manuscript up properly,
- developmental self-edit of your manuscript,
- line editing and proofing your own work.
The Ultimate Guide to Self-Editing your Manuscript: What is Self-Editing?
 Finishing a book is definitely a very satisfying moment. You feel great, and so you should. It’s a wonderful achievement to have completed a full-length work. Many try. Few succeed. Desk drawers and computer hard drives are full of half-completed books the world over.
The trouble is that many first-time authors don’t realise that when you type “The End” on the final page of your first draft, you haven’t finished at all—the process of writing the book is far from over at that point. It’s completely normal to rewrite many drafts of the same MS, especially if you’re new to writing, but we live in a world of immediate satisfaction. Writing a book may have been the single most complex and concentrated task you’ve ever undertaken, equivalent in time and mental energy to completing a degree course. You’ve had to make sacrifices—perhaps given up some commitments to family time or social life. Having now got to the end, you want results. People ask whether you’ve finished your book, and when you say you have, they want to read it.
Additionally, there’s an unfortunate emphasis in some writing circles on speed—write your book in a month, have a quick read through, and then stick it on Amazon as an ebook the following month. Bingo! You’re a published author. Write the next book. Write a series. The more books you write in a year, the bigger chance you have of making money. It’s as if by flooding the market you can drown out all the other authors, and get readers to buy your book instead of the hundreds of thousands of others that are published each year. In contrast, the idea of going over and over the same book—revising, changing, rewriting—doesn’t carry anywhere near the same magic as seeing the word count steadily grow on a new project. Writing is fun, creative, exciting; editing is hard work.
Ernest Hemingway famously said, “All first drafts are shit.” Perhaps he was being a little melodramatic, but not even many bestselling authors can bang out a draft straight off, send it to their publisher for a quick tidy up and then publish immediately. If they do, dare I say it usually shows? The book is likely to be generic and not particularly original or compelling—in short, formulaic. There’s lots of money to be made by accomplished authors writing to a formula but the chances are, if you’ve picked this book up, you’re not an accomplished author, or you haven’t found a formula that works, yet.
For you to rush to publish that first draft as soon as you’ve finished it and get on with the next book might seem a good idea, but may I suggest it rarely is. If you publish a first draft, it’s likely that there will be mistakes. (As a rough idea, most average length novels I do a first copyedit on have between five and ten thousand corrections. Yes, you did read those numbers right. Some of those will be almost invisible to the average reader—two spaces instead of one after punctuation, for example—but many hundreds will be glaring and obvious.) Readers who pay even a little money for your book will write scathing reviews about poor punctuation, bad grammar, nonsensical plots and unbelievable characters. Those reviews will be there forever, putting other potential readers off your writing. Far from forging a career as a writer, you might have done a good job of shooting yourself in the foot.
So what is the process that changes that rough first attempt into the polished jewel that is your final draft? That process is called self-editing.
You can purchase a copy of Richard's book here.
The Ultimate Guide to Self-Editing your Manuscript: The Story Edit

Kristina Stanley, ALLi Storyediting advisor and CEO of Fictionary.co
Sharing a draft of your novel with anyone for the first time can be scary. The stress of waiting to hear back from your readers or editor, of worrying about what they might say, and wondering if your writing is ready to submit can take its toll. So why would you share your work with anyone before you’ve revised your first draft, improved it, making sure it’s as good as you can make it before anyone else reads it?
You wouldn’t. That’s why you perform a story edit also known as a developmental edit or structural edit. All fiction writers need to know what to evaluate when revising their story. We’ll give you the top 3 questions to ask yourself when performing a story edit for characters, plot, and settings.
Characters
During a story edit, you’ll take a hard look at your characters. How often do they appear? What are their goals? What gets in the way of their goals? Characters will drive the tension in your story, and tension is what keeps a reader engaged in your story.
Plot
Performing a story edit on your first draft means analyzing your story from a high-level perspective and fixing any weak areas. You want to make sure the story structure makes sense, the scenes are tense, there are no plot holes, and your key scenes appear in the best place along your story arc.
Setting
Finally, the story edit should examine your settings. Do you make the most of your settings? How often do you use the same setting, and is it too often? Do your settings help with the tone of your scenes or add tension? Settings are key to keeping your reader engaged, so don’t ignore them.
The Ultimate Guide to Self-Editing your Manuscript: Where to Start Your Story Edit
Now that we’ve set the scene, so to speak, here are the top three questions to ask yourself when you review a scene and look for ways to improve it.
1. What is the purpose of this scene?
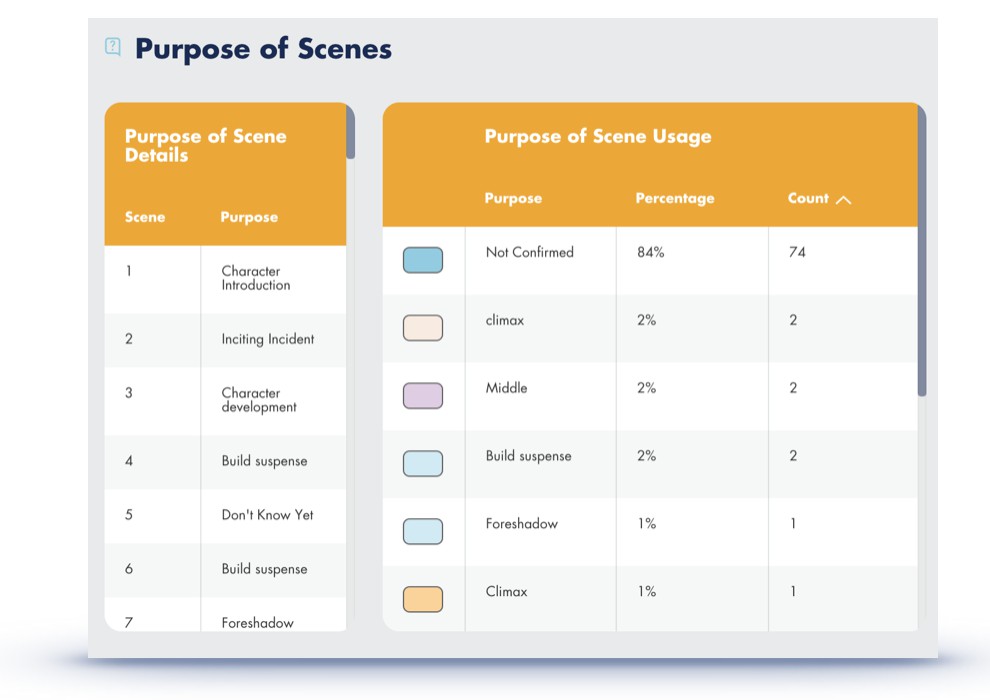
Defining the purpose of the scene first allows you to address other elements of the scene and test if they are in line with the purpose. A scene may have more than one purpose, but see if you can, choose the most important one and then ask yourself does this help drive the story forward.
Here’s a peek at how Fictionary StoryTeller helps you keep track of the purpose of each scene.
2. Who has the point of view?
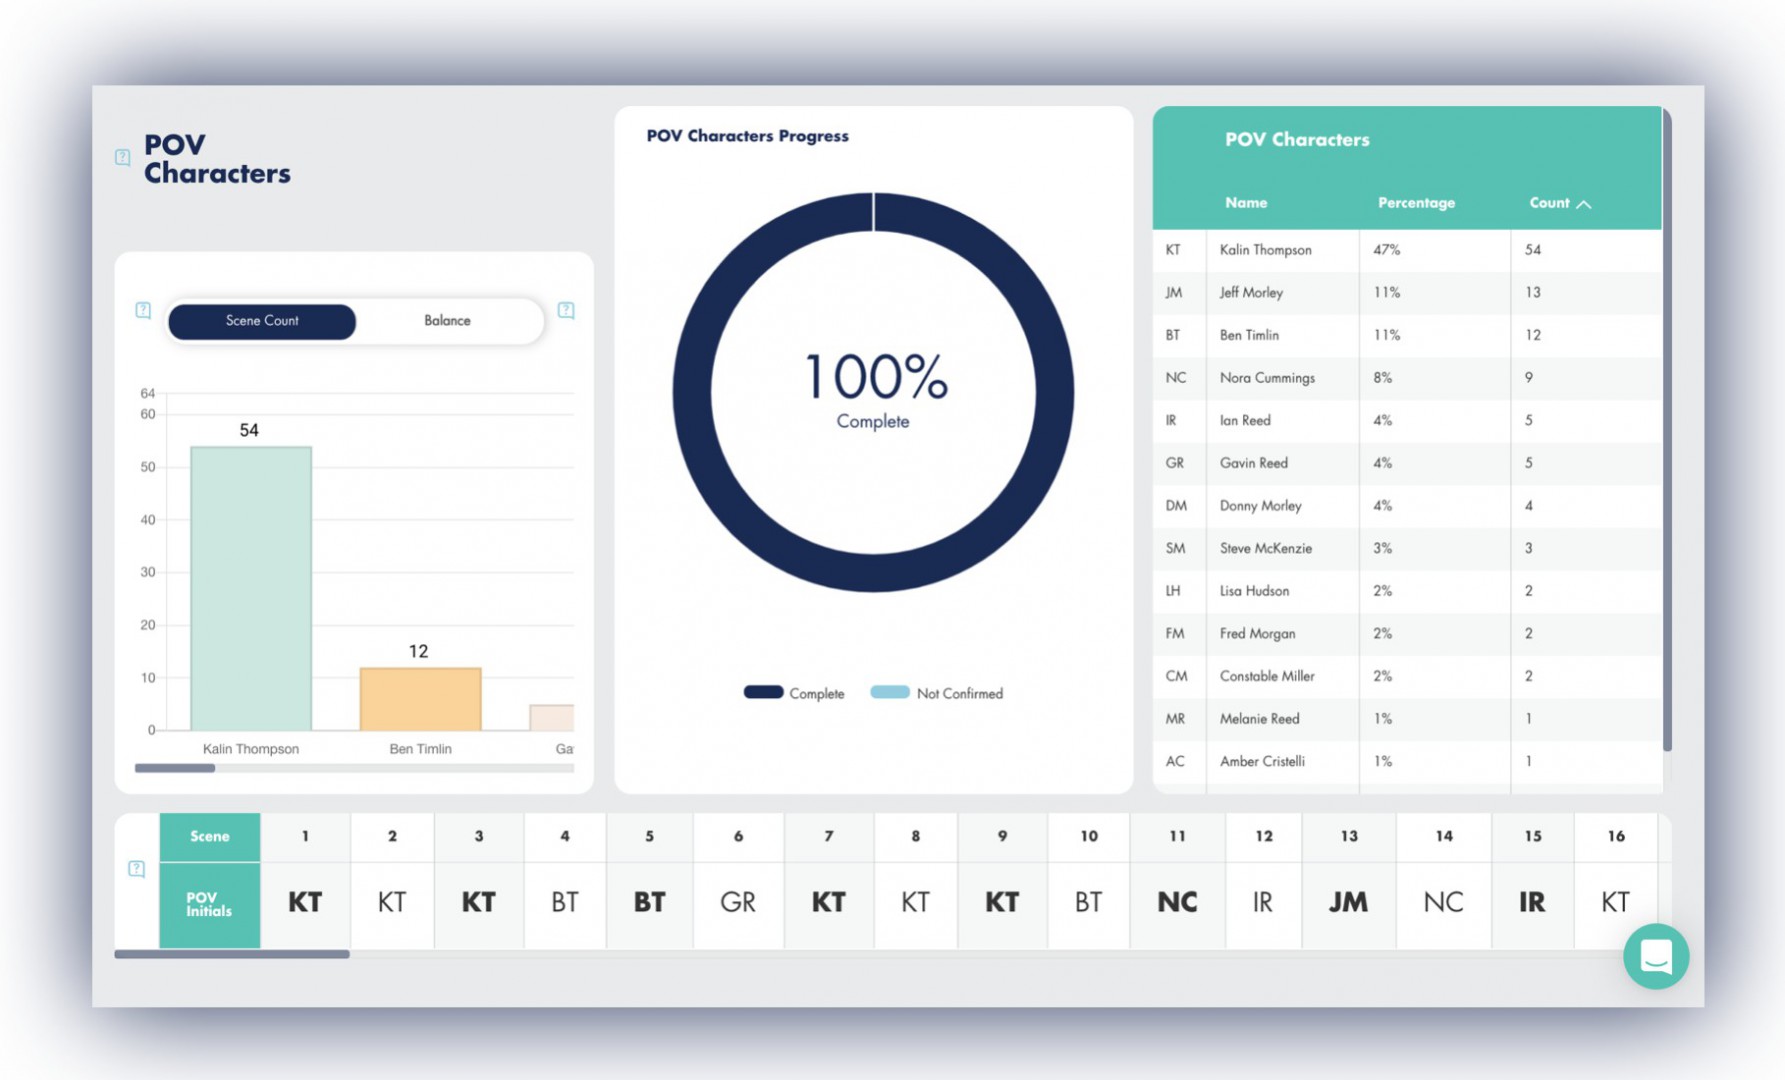
Multiple points of view (POV) means the character who controls the POV for a scene changes from scene to scene. As a writer, you must be in control of this aspect. The generally accepted method is to have one POV character per scene. Switching mid-scene can be known as head-hopping and can jar the reader from the story.
To keep track of you POV characters, list and them and determine if you have the right balance. Does the protagonist have the point of view for the majority of scenes? And does she/he appear early in your story? Make sure you don’t have too many POV characters like the manuscript shown below in Fictionary StoryTeller.
3. Is the setting the best place for emotional impact?
The location of a scene can bring out emotion, both in the character and in the reader, if the location is chosen to do so. This is one of the top three elements as each scene must take place somewhere and each location has the potential to ramp up emotion.
When answering the question, think about who has the point of view for the scene and what makes them feel strong or vulnerable.
Do you have a character who is afraid of the dark? Imagine the character is about to have a confrontation with an employee. If the character feels confident being in his/her own office and you want the character to be in a position of strength, then use the office as a setting. If you want the character to feel vulnerable during the confrontation, try locating him/her outside, at night, in an isolated parking lot. And make it very dark. The streetlight is broken. There is no moon. Maybe it’s windy, so a cry for help won’t be heard.
In Fictionary StoryTeller, you can use the Story Map and select the POV character, Location, and Emotional Impact to help you evaluate how strong your location choices are in the context of the overall structure.
Here you see what scenes that need revision. Anywhere marked with no, means I wasn’t happy with the chosen location.

Tackle each question and edit each scene accordingly.

Alison Shakspeare of Shakspeare Editorial
The Ultimate Guide to Self-Editing your Manuscript: Getting it in Shape
Alison Shakspeare set up Shakspeare Editorial to help make books the best they can be. As an ambassador for the Chartered Institute of Editing and Proofreading she's given talks to writers groups and publishing students, which made her realize how useful some basic information on the use of Word and stylesheets would be.
Readers may disagree with a spelling or be critical about a plot line, but if you are consistent and logical then they have little to complain about – and may end up as followers. So, whether you plan to use an editor and typesetter, or whether you manage your book creation yourself, here are some tips to smooth the transfer from brain to manuscript to published volume that will save everybody time and money – and criticism.
These tips are set up as, one, things to establish before you start; two, keeping track as you write; three, how to tidy up your finished work. They should all help you to produce a high-quality, consistent manuscript that will be a delight to edit, to design and to read. If you only look at one tip, then go to Styles and how to apply them. If you’re not already doing it, I guarantee you’ll never look back.
Setting up Before Writing
Software
Familiarise yourself with your software and use its inbuilt facilities to smooth the transfer of words from your brain to the screen. Microsoft Word is the one I use, as do the majority of my clients, so this is the software I’ll reference. But all writing software has elements of these, so look through Preferences, check the tool setups, and adjust accordingly.
Your aim is to set up your software’s Tools so they automatically adjust and flag up problems. And remember, you can turn them on and off.
Toolbar and keyboard
You can add and delete from the icons to make sure that the tools you use most/least, or find more helpful/irritating are handy/deleted. You can keep adjusting these until you are happy.
You can also set up your keyboard so that your fingers do the adjusting as you type rather than having to break the flow to use a mouse or pad. For instance, changing in and out of bold or italic or underline as you go by typing Cmd+b/i/u before and after the word. Look at what’s on offer under Tools/Customise Keyboard.
Language
In the bottom bar of the document, Word shows what language is in use where your cursor is placed. Check that you are using the language you want to publish in because:
- First, it helps with spellcheck. If the Spelling and Grammar check is on in your document, and Language is set for US English, but you are a UK local, then you are going to get very irritated with the red lines under colour and traveller. Ditto if you are writing in French or German or – well, the list of languages offered in Word is as long as the list of countries.
- Second, it affects the direction of type. If you’ve produced your manuscript in Arabic and then translated it to English without changing the language, it can play havoc with the placement of punctuation and with letter spacing or availability of fonts.
Beware, a single document can contain multiple languages – especially if you are a frequent cutter and paster.
You’ll find language settings under the Tools menu.
Autocorrect
If your fingers insist on typing ‘adn’ instead of ‘and’, or ‘freind’ instead of ‘friend’ (check the inbuilt list), or if there is a regular phrase that is getting boring to type (like The Fairy Institute of Grander Dynamics) then add them to the Autocorrect list and ‘adn’ will instantly dance round and ‘tfigd’ will transmogrify into ‘The Fairy…’. But it will only work if Autocorrect is turned on. You’ll find the Autocorrect list under Word/Preferences.
The Ultimate Guide to Self-Editing your Manuscript: Templates
Every time you open a new Word document the program uses the template normal.dotm, which it stores in a Library folder. You can make changes to this template or you can create a template just for your manuscripts (or for a specific series or book). You can also select a different place to store it.
Why would you want to design a specific template? Well, publishers can require elements that help with, first, making a manuscript easier to edit, and second, preparing it for typesetting. If you start with a template that is primed for this, without hampering your writing, then it can avoid changes that could lead to mistakes, and therefore saves time and money all round.
Get the words right first, don’t get hung up on what a manuscript looks like at the start. The beauty of the computer age is how easy it is to alter design, if the document is properly set up.
What is worth setting up?
Page size
Use A4, especially if you are going to submit to an agent or publisher, or want a quote from an editor, it’s less distracting (and less irritating).
Margins
White space is a ‘good thing’ and Word’s standard margins are about right. So don’t be tempted to go right to the edges – it leads to screen and wrist strain as you swing from left to right!
Footers and headers
Setting these up properly can help you keep track of where you are in a document and which document you are working on. You access them through View/Header and Footer, and you can add Fields so that when you save a new document it automatically picks up or amends specific information, such as the File Name (useful for keeping track of different versions). Useful items to put in headers or footer are:
1. Page numbers
Always worth putting these into either header or footer, especially if it is likely to be printed out at any time. You can add them as text or as a text box, as just that page number, or as the page number with the total number of pages.
2. Titles
If you produce series, or like to use a new document for each chapter, then you can automatically add the series name or book title to the header by putting the information into the appropriate box that opens via File/Properties/Summary, which is then picked up by inserting the appropriate Field option.
You can also add author name with a copyright symbol.
3. Styles
If you do nothing from this list but apply styles you will be a winner. It is also where you can have a little fun with the look, without leading to expensive amendments.
Properly using this facility saves hours during writing, while editing and when it comes to designing, typesetting and ebook formatting. The correct application of headings makes the relationship of one part of text to another so much easier to understand; and makes creating and amending a Table of Contents (or ToC) as easy as falling off a log.
Other classic mistakes that cause problems with designing and ebook formatting are:
- creating space between paragraphs with a double paragraph return
- indenting paragraphs by using a tab, or several
- tapping in a double space after punctuation.
The Ultimate Guide to Self-Editing your Manuscript: The Clean Up
These are the first things a professional ‘cleans up’ in any project, so if they’re not there in the first place, time is saved. The best way to do this is by setting up – and applying – Styles.
Modifying styles
You can access styles via Format/Styles, from the top toolbar or by using the Styles Pane. Click on a style to modify it or to update it to match a selection you have just changed. If your cursor is in a paragraph (not highlighting a word or phrase) and you click on a style, then you have applied that style to that paragraph. The beauty of this is that any change you then make to that style, changes every occurrence. You can then embed that style in your specific template by ticking ‘add to template' when you modify it. If you don’t add it to the template, then that Style will only appear in that document.
To avoid Word styles becoming a nightmare, remember that they can affect each other. In the Modify Style pane you’ll see whether that style is based on another. If you see changes to, say, a Heading after you’ve changed the Normal style, then you can break that link in the Modify Style pane by changing ‘Style based on’ to ‘No Style’.
Check at the bottom of the Styles pane to see which List you are looking at: Recommended styles; the styles that are in your document or that you are using; or all the styles Word has available to you. Different views are more or less useful depending on whether you are creating, amending or using styles.
Headings
In your average fiction manuscript you’ll only need to use Heading 1, for your chapter title. But do apply it, don’t spend time changing the size of font, making it bold, centring it and then having to remember what you did and doing it again for the next chapter title and the next and…
You can have fun with fonts and colours and spacing at this stage, because it is easy enough to go back to being sober (or sombre) merely by re-modifying the style.
The other important outcome is that an automatic ToC (for print or ebook) looks for Heading levels. So if you haven’t applied them, it won’t find them, and you’ll be labouring manually for hours – and creating inconsistencies. If you’ve applied the Style, then changes in the text are automatically picked up when you update the ToC. If your book uses several heading levels, then seeing an updated ToC can be a huge help during editing.
Body text
An almost universal requirement among agents and editors is that a manuscript should be in a basic font (e.g. Times Roman), in 12 point, and 1.5 line spacing. All easy enough to set up as your Normal style. If you like indented paragraphs, then this is where to set that up (Modify Style/Format/paragraph/first line indent) and avoid all those random tabs that will have to be deleted.
You can also set spacing between paragraphs (particularly useful if you don’t like indented paragraphs), which avoids all those double paragraph returns that will also have to be deleted.
Other useful styles to create are:
- indented paragraphs for quotes
- list styles (bullets or numbers)
- first paragraphs to a chapter that are not indented if all other paragraphs are.
The Ultimate Guide to Self-Editing your Manuscript: Keeping Track With a Stylesheet
If there is a different way to write a word or phrase, you can almost guarantee it will appear within the same document. Sometimes it matters, sometimes it reflects a character, but if you haven’t made a note of it you won’t notice it.
Editors use the term stylesheet for a useful document that keeps track of decisions on language, spelling, punctuation, hyphenation, capitalisation, abbreviations, references, character relationships, timelines – in fact, anything and everything about a manuscript that ensures consistency and sense.
Having a stylesheet to hand saves you time in the long run because you won’t have to remember how you decided to spell somebody’s name, or whether you were going to use a hyphen in, say, well-being, or that you’d decided to make it one word, wellbeing.
For fiction and for series it is especially useful to keep track of locations and people’s names, of relationships and timelines. That way you avoid characters popping up in the wrong place or time, or referring to something in the past that has yet to happen. And you won’t confuse readers, who think you’ve introduced a new character because a name has changed.
Depending on how you work, create your stylesheet in a document (arranged using columns or tables) or on a spreadsheet (using one or more worksheets). You can populate this document as you write. Then, if you decide to change your mind about something, at least you’ll know that you need to Find and Replace to update all previous appearances and keep up your consistency. It’s very useful to base your decisions on a single dictionary (such as Merriam Webster in the USA or the OED in the UK, both of which are available online). If you are spending a substantial amount of time writing it is probably worth subscribing to one as a source of synonyms as well as spellings.
Typical Inconsistencies to Avoid
Spelling
- UK or US spelling, stick to one or the other
- -ise/-yse or -ize/-yze (e.g. organise or organize, realise or realize, analyse or analyze)
- amid or amidst
- among or amongst
- focused or focussed
- forward or forwards
- judgement or judgment
- toward or towards
- while or whilst
- are you going to use US or USA; or US when you’d use American and USA for the United States.
Hyphenation
Apart from decisions on a hyphenating compound words (online and worldwide or on-line and world-wide) you need to decide on whether the majority of words preceded by, for instance, anti-, co-, pre-, re-, self-, multi- are going to be hyphenated or not (e.g. co-ordinate, cooperate, multi-storey, multinational). Whether you hyphenate or not is very rarely going to affect or be affected by a character.
The trend is for dropping hyphens and, as long as the sense isn’t compromised, why not? But the main thing is to keep it consistent across the manuscript.
Capitalisation
You say internet, I say Internet; you say a President, I say any old president – it’s your stylesheet, you decide; then stick to it. But just because you love the odd capital letter for emphasis doesn’t mean your reader will enjoy being smacked in the eye too often. As a rule of thumb, keep capitalisation down.
Number systems
There are two generally accepted ways to type numbers: one to ninety-nine in words, 100 and above in figures; or one to ten in words, 11 and above in figures. But if you are talking about units of measurement then, generally, use figures. Pick a style and keep a note of it on the stylesheet. Of course, this doesn’t affect years, they should always be in figures.
If you are going to talk percentages then decided whether you are going to use 0% or 0 per cent (or percent for US writers), the latter is nicer in fiction.
Punctuation
You need to stick to single or double quote marks for specific uses. To indicate speech, US style is a double quote mark, UK style is a single quote mark. Then, if there is speech within speech, you use the alternate mark. For instance:
- US style – My aunt said, “I just saw Jenny outside. She yelled, ‘Have you seen Tommy?’ Well I haven’t, and I told her not to shout.”
- UK style – My aunt said, ‘I just saw Jenny outside. She yelled, “Have you seen Tommy?” Well I haven’t, and I told her not to shout.’
If you are writing speech, then keep the punctuation inside the quote marks. If you are quoting somebody in a factual manuscript, then US style is to keep punctuation inside the quote marks, UK style is punctuation outside.
However, whatever your national affiliation, you may decide to use double quote marks for speech and single quote marks to indicate an inner dialogue. And if you do, it is especially important to be consistent, or your reader will get lost.
Have you heard of the serial, or Oxford, comma? This is when you use a comma to separate every phrase in a list sentence, including before the last ‘and’. It is very much in use in US grammar, and if you are using -ize/-yze endings. Sometimes it is very much needed for sense, even if you aren’t using it elsewhere. But if you start using it, keep it up.
The Ultimate Guide to Self-Editing your Manuscript: Checking After Writing
Congratulations, you’ve penned your last word, you’ve resolved your plot, you’ve made your point – but don’t think you’ve finished your book. As every successful author will tell you, a great final product comes out of the editing – and you can do a great deal of this yourself. First, you need to adjust your approach and, second, learn to use certain tools to help with the obvious stuff.
Approach
Don’t rush the process. Shut down the files for a while. Have you got a month to give your brain a rest and a chance to re-calibrate? Then you can come back to the manuscript with a fresh perspective.
Two ways to read it that fool your eyes into seeing it anew are to:
- read it backwards – not literally word by word (that would be too confusing), but paragraph by paragraph from the back of the book
- read it aloud – a great way to feel the flow that can highlight duplicated or excessive words and phrases, and show up where to improve punctuation.
Depending on how much you can hold in your brain at one time, you need to check each of these aspects with their own read through (and a doublecheck against your stylesheet):
- character consistency – is each character behaving as they ought; have you conflated two characters; or lost a character; or given somebody blue eyes and a red beard, when they’d once had green eyes and black hair?
- timeline consistency – have you suddenly introduced time travel; or changed a sequence of events; or made something happen at an impossible point in your plot?
- tighten dialogue and description – there is a fine line between sounding like somebody talking and just rambling, and between setting the scene and over-egging the pudding; you may think the great Samuel Johnson a bit harsh, but he wasn’t far wrong when he advised: ‘Read over your compositions and, wherever you meet a passage which you think is particularly fine, strike it out.’
- check word frequency – are you a fond user of ‘as well as’ or ‘suddenly’ or some other word that either doesn’t need to be there, or that would benefit from being replaced by a synonym? Your reader will thank you if you give it some thought.
The Ultimate Guide to Self-Editing your Manuscript: Tools
Word’s Find and Replace
This is a useful method of cleaning up your manuscript in tandem with your stylesheet.
You can access this facility under Edit/Find/Replace, or by clicking on the search icon and Find Match in Sidebar. By using the sidebar you can see exactly how many occurrences there are and where they are and move easily from one to the other.
You can refine your search by using wildcards, capitals and whole words. If you want to use styles as part of the search, you’ll need to use Advanced Find and Replace. It’s a matter of suck it and see, try variations, first syllables of words, alternate spellings. It can be a powerful search tool but, BEWARE, do not press Replace All unless you are absolutely sure of what you are asking. It is very easy to create strange hybrids if you replace, say, ‘here’ with ‘hair’ to end up with ‘thair’ or ‘whair’ or ‘thairafter’.
Word’s Spelling and Grammar check
In Tools you’ll find Spelling and Grammar. It runs through your document and highlights problems (and bases itself on the language you’ve chosen). It is very useful to check punctuation consistency and correct use, and can help you avoid overlong sentences. It also points out unnecessary spaces and duplicated words. BUT, do not take its suggestions as gospel. It frequently comes up with ludicrous suggestions that show it has completely misunderstood your sentence. Sometimes these do highlight bad writing, so read them and think about them, but if they continue not to make sense then ignore them and move on.
Third Party Checkers
Other blogs have been written about useful software and online consistency checkers (e.g. https://intelligentediting.com; www.grammarly.com), so I suggest you check these out. Some are free and worth using as a third eye (as long as you keep your brain engaged). But they probably are not worth investing in unless you are going to spend many hours and weeks a year editing a range of documents.
***
If you’d like to receive a free, basic model template or stylesheet then just drop me a line ([email protected]) with a brief description of the genre and language you work in and I’ll send you one with all best wishes for a high-quality, consistent and readable book.
The Ultimate Guide to Self-Editing your Manuscript: 5 Key Fixes When You Line Edit and Copy Edit Your Own Story

Lisa Lepki Head of Marketing at ProWritingAid
Lisa Lepki has been working since 2015 to build the ProWritingAid community to over 1.5 million writers today. She thinks everyone has something important to say and believes ProWritingAid can help them say it in the best way possible.
***
We all know good writing is about more than just good grammar. Certainly, you must find and fix all grammar and spelling mistakes if you want to be taken seriously, but good copy editing is also about strengthening your text. It’s about using the best possible words and constructions to paint the clearest, most compelling picture for your reader.
Below, I’ll share 5 key writing issues that flag a writer as an amateur.
The Ultimate Guide to Self-Editing your Manuscript: Stop Your ‘Writing’ From Getting in the Way
Whenever your reader has to re-read a sentence because they didn’t understand it, they are coming out of your world for a moment. If you use a word they don’t understand, they must either stop and look it up or guess at the meaning based on context. And they might guess wrong, which means your idea is not reaching them correctly.
Aim for a middle school readability level. Don’t mistake this for juvenile writing—the ideas can be complex while the writing is clear. ProWritingAid checks your manuscript’s readability score to make sure your readers won’t feel overwhelmed or distracted by the writing itself.
The Ultimate Guide to Self-Editing your Manuscript: Cut Your Adverbs

Contrary to what Mr. King might say, adverbs aren’t inherently good or bad: it’s all in how you use them. Adverbs are modifiers; they add color and refine meaning.
Examples of Adverbs:
Helen walked quickly back to John’s apartment.
“Quickly” modifies the verb “walked.”
Unfortunately, we can’t make it to your wedding.
“Unfortunately” modifies the entire sentence.
Most (but not all) adverbs end in -ly. Examples include quickly, helpfully, apprehensively, grumpily. The adverb adds more nuanced information to the verb.
- He gave her a ride.
- He helpfully gave her a ride.
- He apprehensively gave her a ride.
- He grumpily gave her a ride.
Each of those sentences paints a different picture because of the adverbs.
Adverbs are problematic in two ways:
1) When writers use them to boost a dull verb
When you’re editing, search for adverbs that prop up weak verbs. Verbs are the most powerful elements of language. Don’t use a weak verb and then try to give it power with an adjective.
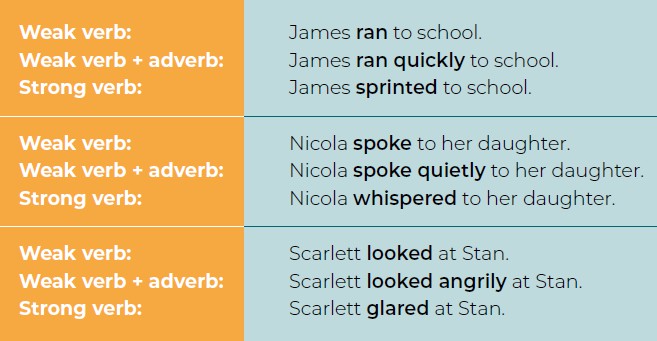
2) When writers use them to add emotion
Don’t use adverbs to add emotion to a scene. Use the action of the scene to show emotion. It’s the old “show, don’t tell” rule.
Let’s think about this example: “He apprehensively gave her a ride.”
What are some other ways you could show his apprehension? Perhaps he hesitates and looks around before unlocking the door. Maybe he tried to make an excuse before relenting and offering a ride. Is he gripping the steering wheel tightly? Is he sweating? If you say “apprehensively” then your reader must try to imagine what that looks like. If you paint a clear picture with your words, then there is no need for the adverb. Your reader already understands he’s feeling apprehensive.
The Ultimate Guide to Self-Editing your Manuscript: Get Passive Aggressive
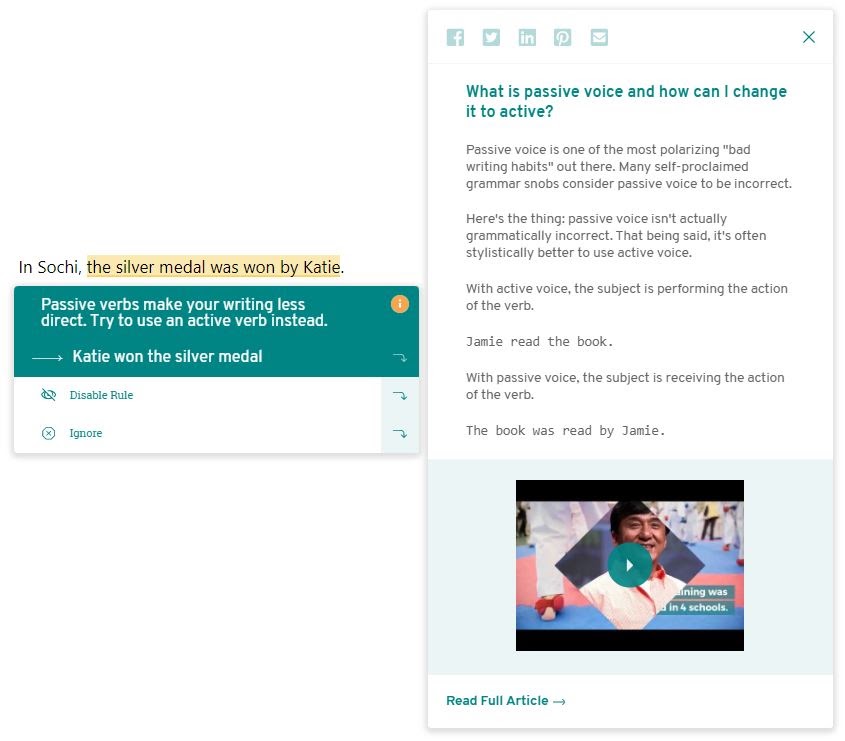
Passive voice is not grammatically incorrect, it just often weakens writing. It’s always worth double-checking if you can improve the sentence by rewriting it in active voice.
What’s the difference?
Passive voice means you’ve written the object of your sentence first and the subject at the end.
Passive: The bottle was recycled by Joe.
Active: Joe recycled the bottle.
Think about who is doing the action. In this example, Joe is the subject, he is the do-er, and the bottle is the object. Both sentences say the same thing, but in the first one, the focus is on the bottle; in the second, the focus is on Joe.
In passive, the reader waits until the end of the sentence to discover who is doing the action. Action and the verbs showing action give your writing power. Imagine you’re painting a picture of the scene in your reader’s head. They can’t visualize the scene until they know who performed the action.
Use ProWritingAid to flag passive voice. You won’t need to rewrite all sentences written in passive voice, but you will improve many by changing them to active.
The Ultimate Guide to Self-Editing your Manuscript: Avoid Clichés
A strong metaphor has an unparalleled ability to convey your meaning. We understand new things by relating them to things we already know.
In As You Like It, Shakespeare wrote, “All the world’s a stage, / And all the men and women merely players.” Of course, he didn’t literally mean the planet is a giant stage. He used his own understanding of theatre to create a metaphor that helps us understand a larger point about human nature. This is much more effective than if he had just written, “People undertake many different roles throughout their lives and sometimes pretend to be something other than their true selves.”
The metaphor gets across a nuanced insight because readers and audience members are able to take everything they know about stage performances and apply it to this concept. As such, there is a great deal of depth already embedded in their understanding.

Whenever you use a cliché, however, you’re knowingly writing something unoriginal. Clichés are metaphors that have been victims of their own success—everyone has heard them a million times before and so they are instantly forgettable. Writers often use clichés when they are working on their first draft because thinking up original wording takes time and can interrupt creative flow. That’s fine. But when you go back to edit, be creative and brainstorm for fresh ideas. A new analogy or metaphor makes more of an impression on your readers than a dusty old cliché.
The Ultimate Guide to Self-Editing your Manuscript: Cut Splashy Dialogue Tags
Dialogue tags are the words that refer dialogue to a specific character. The two most common examples are “said” and “asked”.
“I’m not going!” Charlie said.
Dialogue tags are essential in writing, particularly in scenes that include several characters, because they help the reader follow the conversation. Ideally, your dialogue tags should be invisible within your writing, just signposts that point out who is speaking. Novice writers, however, have a tendency to use more flowery dialogue tags and pepper them with adverbs (and you know how we feel about adverbs!).
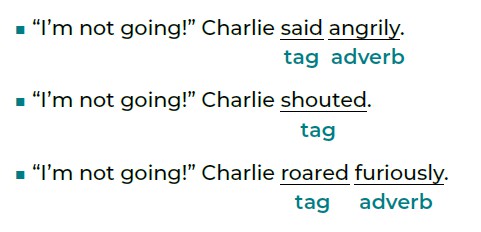
Tags like these are usually signs of writers breaking the “show, don’t tell” rule. The character’s actions or the dialogue itself should be carrying the emotion. Don’t depend on a tag to make your reader feel something.

Here, Charlie’s anger was shown, not told. The reader knows he’s the one speaking and his fist shows he’s angry instead of an adverb. It gives a much stronger sense of the scene
The Ultimate Guide to Self-Editing your Manuscript: Line Editing and Copy editing
 Writing can be grammatically perfect but still feel awkward and clumsy. ProWritingAid searches repetitiveness, vague wording, sentence length variation, over-dependence on adverbs, passive voice, over-complicated sentence constructions, and so much more (20 reports in all). And when you get this result, you’ll feel awesome!

FREE DOWNLOAD: This article was an excerpt from the book, Your Editing Journey: How to Make Your Manuscript Shine.
Download it for free, for a limited time.

Editing manuscript signifies some steps, and if followed the manuscript turns out to be good. First to introduce yourself, and then to make changes in grammar, punctuations, make up your preferences, provide a clean manuscript and lastly the conclusion. To prepare a good manuscript, one needs to follow the steps accordingly.
very well written. had given it a read and it was worth the time.