Writing from his home in France, British novelist James Minter shares his top tips for making a low-budget book promotion video to boost your self-published book's discoverability.
When launching my latest humorous book, A Tunnel is Only a Hole on its Side, seeking something new to make me stand out from the crowd, I decided to make a video of me reading from my book to connect with potential readers. But video is a double-edged sword: nothing will turn prospective readers off more than a poor quality video.
This requires self-published authors now have to master a whole new skill set – camera person, sound quality engineer, makeup artist, set designer, voice coach, video editor, etc. Acutely aware that writers are poor, time strapped and not necessarily very technical, I’ve put this blog post together to help you cut through this minefield.
Lights, Camera, Action Points
My experience is based around using my phone and tablet. With a phone, the temptation is to video yourself with the front camera so that you can see your image on the phone’s screen while you're filming. However, the quality of the front camera can be too poor to use: it's VGA standard which looks grainy when displayed full screen. Therefore use the rear camera of your phone unless you know your front camera has good enough resolution.
A stable shot is paramount, so fix your phone to a tripod. The camera lens should be level with your eye line. To enable you to see what you're filming, place a mirror behind the phone so you can see the screen. Remember you'll be working the controls of the camera back to front, but just practice and all will be fine.
Next is lighting. The sensors in smartphones are small compared to digital cameras and require good lighting to work efficiently. In low light your video will look gloomy, poor/flat colours and possibly grainy. Although the image on your phone may look great to you, how other people see it will vary according to the device on which they view it – tablets, laptops, PC monitors, intelligent TV. Think quality all the time.
Avoid harsh lights and don't sit near a window, to avoid strong shadows on your face. Hanging a sheet over windows will soften glare. Reading lamps can be used. Two are better set at 45 degrees left and right of you; direct, straight on lights tend to flatten your features. Mixing daylight and indoor lights is a no-no as the sensor has trouble deciding which one to work with. This is not an issue if you avoid mixing light sources.
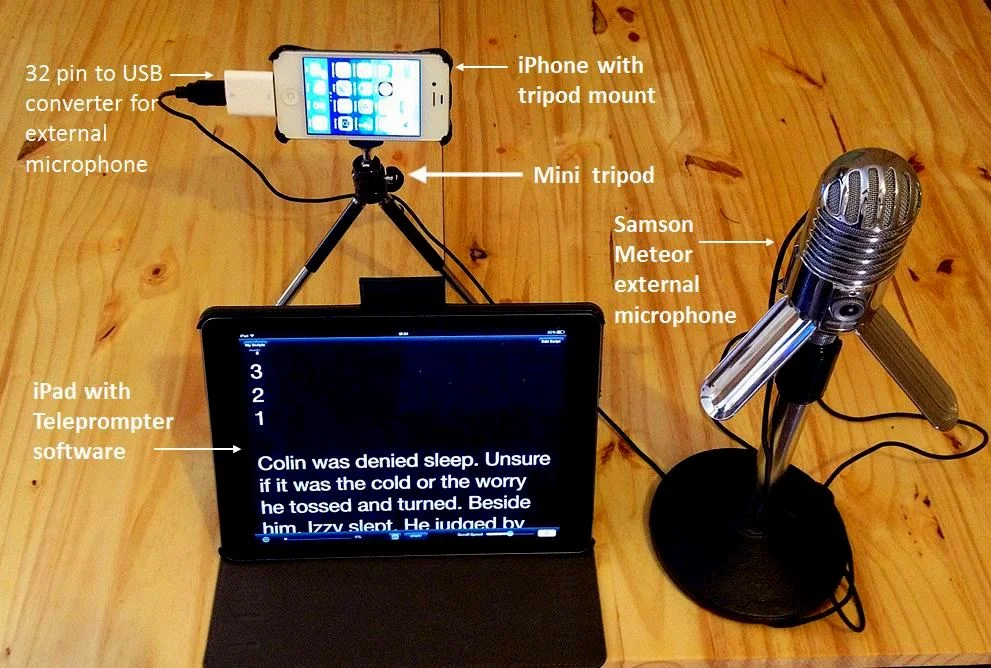
Now to sound: the internal microphone of a phone does not enhance your speaking voice. Instead try one of the many external, affordable microphones available. With a good quality microphone you can make audio samples of your books or complete audio books, so spending £50 on a microphone is a good investment.
Choosing what you wear, any make-up, the room location and, very importantly, what’s behind you – these all impact the “watchability” of the final video. The room must be quiet, away from traffic noise, family noise, TV/radio/computer games, and nature —no birds twittering or dogs barking. Locate yourself so over your shoulder is not too busy – you want simple lines, plain walls, no clutter.
Shooting Your Reading
Shooting while reading from the actual book can be difficult because of page turning – noisy, distracting and the pages won’t behave by not wanting to lay flat but curl. The answer is to use an autocue or teleprompt like newsreaders do on the television. This is where the tablet comes in. There are apps for this. I favour Teleprompter Pro Lite; it’s free from the App Store and does a good job. A few tips on using the software:
- Set the speed control for the rolling text at 12 (or whatever you find suits you best)
- Insert a countdown into your text i.e. type in 10, 9, 8, 7 etc into the top of your file, one number per line, to allow you to turn on the teleprompter and camera and compose yourself before you start reading
- Limit the amount of text to around 1,000 words or 5 minutes of reading – people won’t watch more than this as a taster
- Set the tablet on a table as close to the camera as possible but beneath the camera’s field of view
As you read your eyes will naturally look at the teleprompter and not at the lens. Because the camera is close to you, your audience will see you looking away – unlike news readers where the teleprompter is across the studio and the camera zooms in to give a head and shoulders view.
Taking video is resource intensive – equivalent to 25 still pictures per second – so your phone has to work hard. There are several things you need to do to your phone before your start to shoot video:
- Switch to Airplane mode to stop any internet or cellular phone activity interrupting your reading
- Change the battery-saving “sleep” settings to “never” so they won't shut down in the middle of your shoot
- Check your phone's available storage has available a minimum of 1 gigabyte (GB) – if not, make space
- Kill all other apps running in the background
Framing yourself in shot is important. Make sure you mount your phone in landscape orientation with the home button on the left, otherwise when you come to edit your footage the image and you will be upside down. Position yourself according to the rule of thirds. It makes your video more interesting to the viewer, but more importantly it leaves space to the side of your head for a graphic object such as your book cover to be added in the editing process.
Ready for Action
So now your lights are on, your phone is mounted and set up as directed above, the teleprompt is loaded with your story, the microphone is placed close to you but out of shot, you’re sat comfortable and dressed appropriately. Behind you there is no clutter, pets, children, aged parent or other random things which might distract viewers. Now go for a practice run – open the camera app, choose the front camera and lean back in your seat. Adjust the camera/your position for the best framing position, look for shadows, any speckles on your clothes, and check for glare reflecting from glasses if you wear them. Also men thinning on top reflect light – move yourself, move the light or apply some makeup until it’s no longer visible.
Before you press record, there is one last important setup action. The camera will want to automatically refocus as you move. Moving will change the exposure so the camera continually compensates, so set both then turn these automatic functions off, otherwise your video will display these constant changes. To do this, sit where you will eventually be sat and stretch towards the phone screen (not the camera). Looking at your image touch and hold the screen where you want the camera’s exposure/focus to be; usually your face. Now press the record button and the start button on your Teleprompter, sit back and compose yourself. Watch the count down and wait to begin reading. Don’t start reading as the first line appears wait until its scrolled up a couple of lines otherwise you’ll run out of words to read. But this is a practice session, one of several, I suggest, until you get use to the setup and pace.
Reading aloud is different from reading in your head. It needs to be practised, especially pacing, inflections and breathing. The Teleprompter helps with pacing as it goes at a consistent speed. Above I suggested setting it to 12 but you need to work out what’s best for you and your story. Voice inflections reflect the characters behaviour in the story you wrote. Inflection is the key to keeping the attention of your audience; bring them out in your reading. A dead-pan voice is a turnoff.
You’ve read your piece a dozen times and probably noted some changes you’d like to make to the original text, (not a bad thing). Confident, you’ve gone for a take. Now what?
Post Production Tips
The next stage is post production. This requires editing software. Options are many and varied, costly or free. Some paid packages offer a free trial.
You’ll want to trim your video footage to get rid of long pauses and reading mess-ups. Also you’ll want to add an introduction/opening sequence and an end sequence before finally producing a video suitable to upload to YouTube.
This post describes the very basics I believe, to produce an acceptable video. If you are feeling more adventurous, there are more apps and packages that you could use – but these tips will help you make your first entry into making your own video.
As you can sense from the above, this can get quite involved but hopefully I’ve provided enough information to enable you to miss out some of the trouble spots you’ll encounter on the way. Either way, for your first video I’d allow yourself at least 2 to 3 hours to make a 5 minute film.
To make it easy to share this helpful post with other indie authors, here's our suggested tweet:
“How to make your own author video by @James_Minter for @IndieAuthorAlli: https://selfpublishingadvice.org/reaching-readers-how-to-make-a-low-budget-video/”


[…] This post explains how to make a low budget video. […]
Hi James,
Thank you for this detailed and helpful post. I’m looking for an article that would help me make a book trailer. This is simple yet gave me a lot of understanding.
Great post James. I don’t see any links to one of your own videos on your website? It would be great to see you in action!
Amy
Thank you, James! I really would love to do this, and am convinced that the theme of my book, “Sundays with TJ,” about my 107-year old father’s amazing life would be perfect.
But, I’m still overwhelmed by all the `musts’ and specifics necessary to getting it right. I will reread your directions, very S…L…O…W…L…Y!
Brilliant post, James. While I’m happy to make book trailers, I’ve never dared put myself in front of the camera. I was thinking of just recording onto my iMac, but I’ll have another look at my process. Thank you!