


It's nice to give your reader fans the personal touch. However, in this blog post, Rachel McCollin makes the case that a little automation is a good thing. And she takes us through a step-by-step process to set up automated emails delivering your reader magnets, so you never have to lift a finger again.

Rachel McCollin
For an overview of reader magnets, read our ultimate guide here.
If you’re running an author mailing list (and you really should), you’ll probably know that it’s much easier to get people to sign up if you offer something in return.
For fiction authors this could be a short story, a story collection, a novella, or even a full-length novel if you can spare one. For nonfiction authors, it could be a guide to a topic relevant to your books, a factsheet, short book or tutorial.
Whatever it is, you’ll need to send it to people once they’ve signed up to your mailing list. And the quicker you can do this, the better. When someone has just signed up for your list, you’re at the forefront of their mind. They feel positively about you and your writing and will be eager to read that juicy reader magnet.
If you’re sending out the reader magnet manually, it will mean a delay. Even if your mailing list provider informs you of a new signup immediately (and many don’t), you won’t be able to drop everything to send the reader magnet to them right away.
Which means by the time they receive the file, the reader may have moved on and not be so enthusiastic about reading it.
It also means extra work for you: who wants to spend their time sending out repetitive emails?
Email Automation is Better
Luckily, all of the major mailing list providers let you set up email automations: an email or series of emails which will be sent when a trigger is fired (i.e. a condition is met). And in this case, the trigger is that someone joined your mailing list.
In this post, I’m going to show you how you can use MailChimp and BookFunnel to set up an automation sequence and deliver your reader magnet to readers in their preferred format. Once you’ve set it up, it’ll carry on working for you without you having to lift a finger.
The principles here will apply to other mailing list providers, but I’ve chosen MailChimp because it seems to be the most popular among authors. And it’s the provider I used in this recent post about linking your WordPress website to your mailing list.
What You’ll Need
To follow along with this guide, you’ll need two things:
- A MailChimp account. If you’re with another provider, don’t fret: the principles here apply universally and you should be able to adapt this technique to your provider.
- A BookFunnel account.This will cost you $20 per year for their introductory plan. It will save you a lot of time, so I think it’s worth it. However, if you can’t afford BookFunnel, you could use Prolific Works instead (formerly Instafreebie). I like BookFunnel because of the attractive interface that’s easy for readers to use.
So, let’s get started!
Step 1: Setting up Your Automated Campaign and Trigger
The first thing is to create an automated email campaign and define its trigger.
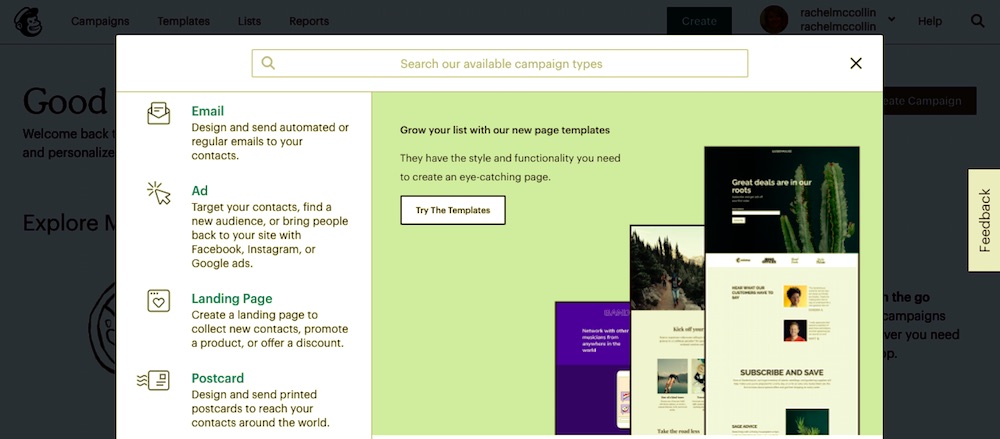
In your MailChimp dashboard, click the Create Campaign button. You’ll be prompted to specify what kind of campaign. Choose Email:
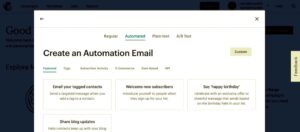
On the next screen, select Automated. You’ll see a list of potential triggers for your campaign. Select Welcome new subscribers.
Now you’ll be prompted to give your campaign a name and select the mailing list it applies to, as you can see in this screenshot:
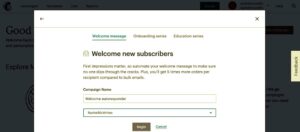
Enter the details and click the Begin button.
You’ll now be presented with the setup screen for your autoresponder. MailChimp will already have created the first email for you. You can choose whether to just have one email in your sequence, or if you want to add more.
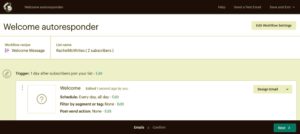
Check the trigger that’s listed against your first email. In my case, MailChimp has defaulted to one day after people sign up. I don’t want that: I want it to be immediate (would anyone ever want any different?). Just click the Edit link and select immediately from the dropdown list then click the Update Trigger button.
Let’s start with just the one for now. This will be the email that someone gets as soon as they sign up to your mailing list and that sends them your reader magnet.
Step 2: Uploading Your Book to BookFunnel
Now open up your BookFunnel account in another browser window (don’t close what you’ve been doing in MailChimp).
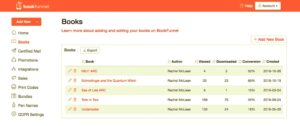
In your BookFunnel dashboard, click on the Books link in the left hand menu. This takes you to your books dashboard. If you’ve just set up your BookFunnel account, this will be empty. But if you’ve been already using BookFunnel (for advance copies, maybe), it will have some books in it, like mine:
Click the Add New Book button on the top right.
Now you’ll see the screen for providing details of your book. Complete the fields as I have here (changing it for your book, of course):
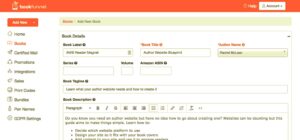
Once you’re happy with your book description, scroll down to upload the files. Click on the upload area to select files from your computer, or drag and drop them into that area. BookFunnel will take mobi, epub and pdf files – it’s up to you which you use but I like to give my readers as much choice as possible.
Don’t forget to add the book cover file as well as the interior files.
Step 3: Creating a Download Page on BookFunnel
Adding your book won’t give your readers anywhere to download it just yet: for that, you’ll have to create a download page.
This step can be a bit confusing, because BookFunnel doesn’t prompt you to create a download page or take you to the relevant screen after saving your book. But it only takes a couple of clicks to get there.
Save your book and go back to your main books screen. Click on the name of the book you’ve uploaded to see its dashboard:
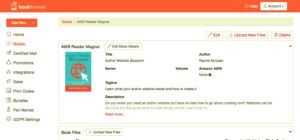
Scroll down to the Download Pages section. You want this section and not the Giveaway Pages section because you’ve already collected email addresses.
Click the Add Page button. You’ll be taken to a new screen where you’re asked if you want to collect email addresses. Select No, just let them download the book. Then click the Create Page button.
In the next screen, you can edit the settings for the page, including what’s displayed and what colors are used.
Enter the name of the page (normally the title of the book) and click the + symbol to expand the Landing Page Settings pane.
Now spend some time experimenting with this and checking the preview until you have it how you want it.
Here’s what my page looks like:
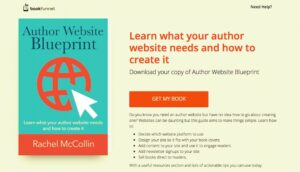
Once you’re happy with it, click the Save Download Page button. Go back to your books screen and select your book again. Scroll down to see the link for the download page:

Copy this so you can paste it into your email in a moment.
Step 4: Editing Your Email and Adding the Download Link
So you now have your book uploaded to BookFunnel with a download page where people can get their copy. You’re almost done!
Go back to your MailChimp account and open up that welcome email if you haven’t already got it open. You’ll need to choose a template for your email, define the subject line and add some content. If you want detailed guidance on creating emails in MailChimp, check out the MailChimp help pages.
Edit the email and add some text welcoming readers and briefly describing your reader magnet. Add a link to your download page in your text. You can add a hyperlink to any text by selecting it and clicking on the hyperlink button at the top of the editing pane:
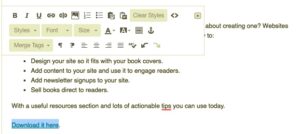
You can also make the image of your book into a link.
Send yourself a test email to check it looks good and that you haven’t missed any typos. When you’re happy with things, click the Save and Continue button.
You’ll then be taken back to the main screen for your autoresponder. If you want to, add more emails to your sequence (I tend to use three or four to give people a good introduction to my work). But if you don’t, that’s fine.
Click the Next button to move to the next screen and activate your email automation. If you’re happy, click the Start Sending button on that screen.
And that’s it! You can now go back to the important stuff (writing), happy in the knowledge that anyone signing up to your mailing list is getting your reader magnet without you lifting a finger.
#indieauthors when #automation is a good thing: setting up emails to deliver #readermagnets Click To TweetSummary: The Steps
If you’ve read through this and want to put it into action without reading it all again, or if you’re returning to this post to start the process of setting up your automation, here’s a summary of the process:
- Create an email in MailChimp and set it to be an automated one. Edit the trigger so it sends immediately.
- Add your book to BookFunnel, uploading files for the interior and cover.
- Create your download page in BookFunnel with the content and design that you want.
- Edit the content of your email, including the all-important link to the download page.
- Save the email automation and set it to start running.
It takes some time to get this set up, especially if you want to create an engaging email which will do a great job of introducing you to your new subscribers. Don’t forget you can always add a second email to give them more information. For now, the focus is that reader magnet.
But once you’ve done it, you won’t have to do anything to ensure that all your new signups get your reader magnet immediately, That has to be worth taking some time.
I only just came upon this Rachel. I’ve struggled for years trying to set up a reader magnet with Mailerlite. I think I’ve almost managed it, thanks to your step-by-step for technophobes instructions. Thank you so much.
This was a great article and so helpful. You saved me from pulling my hair out, I was getting so frustrated at trying to set this up.
Thanks for taking the time to share. Good, easy info!
Really nice article, Rachel. Thank you for making something so complex so easy to understand!
Golden information. Thank you!
I’m just about to go down this route, Rachel, so thank you for your timely post!
A quick question, if I may… Should I create a different list (or audience, as Mailchimp now calls it) for subscribers who join through the reader magnet campaign so I can identify them as being different from an “organic” subscriber?
Hi Hilary, thanks for the feedback! I’m pleased it came at the right time for you.
Thank you so much. This was just what I needed. I had already signed up for Mailchimp and Book Funnel. I have a website with a link to join my mailing list ready to go live. I just had no idea what to do next! So now I can go ahead.
Again, many many thanks.